Never use an ohmmeter of the type
incorporating a hand-cranked generator for
circuit or continuity testing.
Always ensure that the battery negative
lead is disconnected when working on the
electrical system.
Before using electric-arc welding
equipment on the car, disconnect the battery,
alternator and components such as the fuel
injection/ignition electronic control unit to
protect them from the risk of damage.
The radio/cassette units fitted as standard
or optional equipment may be equipped with a
built-in security code to deter thieves. If the
power source to the unit is cut, the anti-theft
system will activate. Even if the power source
is immediately reconnected, the radio/cassette
unit will not function until the correct security
code has been entered. Therefore, if you do
not know the correct security code for the
radio/cassette unit do not disconnect the
negative terminal of the battery or remove the
radio/cassette unit from the car. Refer to the
Owner’s Manual, or your Peugeot dealer for
further information on security codes.
2 Electrical fault finding -
general information
Refer to Chapter 12.
3 Battery - testing and charging
1
Standard and low maintenance
battery - testing
1 If the vehicle covers a small annual mileage,
it is worthwhile checking the specific gravity
of the electrolyte every three months to
determine the state of charge of the battery.
Use a hydrometer to make the check and
compare the results with the following table.
Above Below
25°C (77°F) 25°C (77°F)
Fully-charged 1.210 to 1.230 1.270 to 1.290
70% charged 1.170 to 1.190 1.230 to 1.250
Discharged 1.050 to 1.070 1.110 to 1.130
Note that the specific gravity readings assume
an electrolyte temperature of 15°C (60°F); for
every 10°C (50°F) below 15°C (60°F) subtract
0.007. For every 10°C (50°F) above 15°C
(60°F) add 0.007.
2 If the battery condition is suspect, first
check the specific gravity of electrolyte in
each cell. A variation of 0.040 or more
between any cells indicates loss of electrolyte
or deterioration of the internal plates.
3 If the specific gravity variation is 0.040 or
more, the battery should be renewed. If the
cell variation is satisfactory but the battery is
discharged, it should be charged as
described later in this Section.
Maintenance-free battery -
testing
4 In cases where a “sealed for life”
maintenance-free battery is fitted, topping-up
and testing of the electrolyte in each cell is not
possible. The condition of the battery can
therefore only be tested using a battery
condition indicator or a voltmeter.
5 If testing the battery using a voltmeter,
connect the voltmeter across the battery and
compare the result with those given in the
Specifications under “charge condition”. The
test is only accurate if the battery has not
been subjected to any kind of charge for the
previous six hours. If this is not the case,
switch on the headlights for 30 seconds, then
wait four to five minutes before testing the
battery after switching off the headlights. All
other electrical circuits must be switched off,
so check that the doors and tailgate are fully
shut when making the test.
6 If the voltage reading is less than 12.2 volts,
then the battery is discharged, whilst a
reading of 12.2 to 12.4 volts indicates a
partially discharged condition.
7 If the battery is to be charged, remove it
from the vehicle (Section 4) and charge it as
described later in this Section.
Standard and low maintenance
battery - charging
Note: The following is intended as a guide
only. Always refer to the manufacturer’s
recommendations (often printed on a label
attached to the battery) before charging a
battery.
8 Charge the battery at a rate of 3.5 to 4
amps and continue to charge the battery at
this rate until no further rise in specific gravity
is noted over a four hour period.
9 Alternatively, a trickle charger charging at
the rate of 1.5 amps can safely be used
overnight.
10 Specially rapid “boost” charges which are
claimed to restore the power of the battery in 1
to 2 hours are not recommended, as they can
cause serious damage to the battery plates
through overheating.
11 While charging the battery, note that the
temperature of the electrolyte should never
exceed 37.8°C (100°F).
Maintenance-free battery -
charging
Note: The following is intended as a guide
only. Always refer to the manufacturer’s
recommendations (often printed on a label
attached to the battery) before charging a
battery.
12 This battery type takes considerably
longer to fully recharge than the standard
type, the time taken being dependent on the
extent of discharge, but it can take anything
up to three days.
13 A constant voltage type charger is
required, to be set, when connected, to 13.9
to 14.9 volts with a charger current below 25
amps. Using this method, the battery should
be usable within three hours, giving a voltage
reading of 12.5 volts, but this is for a partially
discharged battery and, as mentioned, full
charging can take considerably longer.
14 If the battery is to be charged from a fully
discharged state (condition reading less than
12.2 volts), have it recharged by your Peugeot
dealer or local automotive electrician, as the
charge rate is higher and constant supervision
during charging is necessary.
4 Battery - removal and refitting
1
Note: Make sure that you have a copy of the
radio/cassette unit security code number
(where applicable) before disconnecting the
battery.
Removal
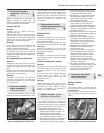
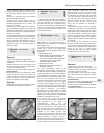
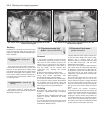
1 The battery is located in the front left-hand
corner of the engine compartment.
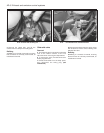
2 Slacken the clamp bolts and disconnect the
clamp from the battery negative (earth)
terminal.
3 Remove the insulation cover (where fitted)
and disconnect the positive terminal lead(s) in
the same way.
4 Release the battery clamp and lift the battery
carefully from the engine compartment.
5 If required, the battery tray can be removed
after undoing the retaining bolts.
Refitting
6 Refitting is a reversal of removal, but smear
petroleum jelly on the terminals when
reconnecting the leads, and always reconnect
the positive lead first, and the negative lead last.
5 Charging system - testing
1
Note: Refer to the warnings given in “Safety
first!” and in Section 1 of this Chapter before
starting work.
1 If the ignition warning light fails to illuminate
when the ignition is switched on, first check
the alternator wiring connections for security.
If satisfactory, check that the warning light
bulb has not blown, and that the bulbholder is
secure in its location in the instrument panel.
If the light still fails to illuminate, check the
continuity of the warning light feed wire from
the alternator to the bulbholder. If all is
satisfactory, the alternator is at fault and
should be renewed or taken to an auto-
electrician for testing and repair.
2 If the ignition warning light illuminates when
the engine is running, stop the engine and
check that the drivebelt is correctly tensioned
(see Chapter 1) and that the alternator
connections are secure. If all is so far
satisfactory, have the alternator checked by
an auto-electrician for testing and repair.
5A•2 Starting and charging systems


