


5.24
Section 5
Fuel System and Governor
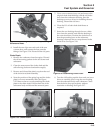
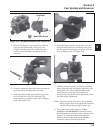
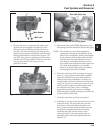
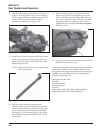
Figure 5-50. Removing Float and Inlet Needle.
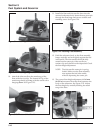
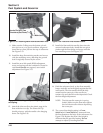
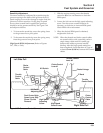
3. Use an appropriate size flat screwdriver, and
carefully remove the two main jets from the
carburetor. Note and mark the jets by location for
proper reassembly. The main jets may be size/side
specific. After the main jets are removed, the
main nozzles can be removed out through the
bottom of the main towers. Note the orientation/
direction of the nozzles. The end with the two
raised shoulders should be out/down adjacent to
the main jets. Save the parts for cleaning and
reuse. See Figure 5-51.
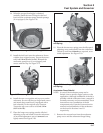
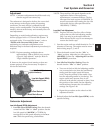
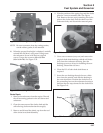
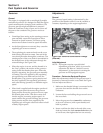
Figure 5-47. Checking Float Height.
NOTE: Be sure to measure from the casting
surface, not the rubber gasket, if still
attached.
9. When the proper float height is obtained,
carefully reinstall the fuel bowl, using new
O-Rings onto the carburetor. Secure with the four
original screws. Torque the screws to 2.5 ± 0.3
N·m (23 ± 2.6 in. lb.). See Figure 5-48.
Figure 5-48. Installing Fuel Bowl.
10. Install the carburetor and the heavy-duty air
cleaner as outlined in Section 11 “Reassembly.”
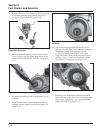
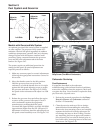
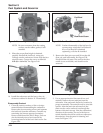
Disassembly/Overhaul
1. Clean the exterior surfaces of dirt or foreign
material before disassembling the carburetor.
Remove the four mounting screws and separate
the fuel bowl from the carburetor. Transfer any
remaining fuel into an approved container.
Remove and discard the old O-Rings. Fuel can
also be drained prior to bowl removal by
loosening/removal of the bowl drain screw. See
Figure 5-49.
Figure 5-49. Fuel Bowl Removed From Carburetor.
NOTE: Further disassembly of the fuel bowl is
not necessary unless the Fuel Solenoid
Kit, or Fuel Bowl Kit (obtained
separately), will also be installed.
2. Remove the float pin screw and lift out the old
float, pin, and inlet needle. See Figure 5-50.
Discard all the old parts. The seat for the inlet
needle is not serviceable, and should not be
removed.
Fuel Bowl
Bowl Drain Screw