


5.14
Section 5
Fuel System and Governor
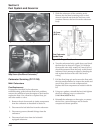
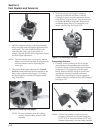
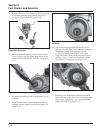
Figure 5-14. Installing Float Assembly.
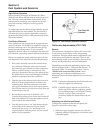
6. Hold the carburetor body so the float assembly
hangs vertically and rests lightly against the fuel
inlet needle. The inlet needle should be fully
seated but the center pin of the needle (on
retainer clip end) should not be depressed. Check
the float height adjustment.
NOTE: The inlet needle center pin is spring loaded.
Make sure the float assembly rests against the
fuel inlet needle without depressing the
center pin.
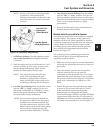
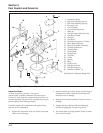
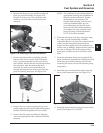
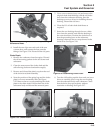
7. The correct float height adjustment is 12.0 mm
(0.472 in.) measured from the float bottom to the
body of the carburetor. See Figure 5-15. Adjust
the float height by carefully bending the metal
tang of the float.
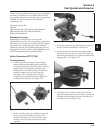
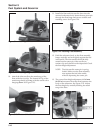
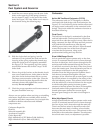
8. When the proper float height is obtained,
carefully reinstall the fuel bowl, with the
O-Ring(s) in place, onto the carburetor. Secure
with the four original screws. Torque the screws
to 2.5 ± 0.3 N·m (23 ± 2.6 in. lb.). Reattach the
accelerator pump hose (if so equipped), and
secure with the clip. See Figure 5-16.
Figure 5-15. Checking Float Height.
NOTE: Be sure to measure from the casting
surface, not the rubber gasket, if still
attached.
Figure 5-16. Installing Fuel Bowl.
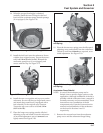
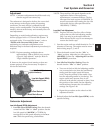
Disassembly/Overhaul
1. Clean the exterior surfaces of dirt or foreign
material before disassembling the carburetor.
Unseat the clamp and disconnect the accelerator
pump hose (if so equipped), from the upper
fitting. Remove the four fuel bowl screws and
separate the fuel bowl from the carburetor.
Transfer any remaining fuel into an approved
container. Remove and discard the old O-Ring(s).
See Figure 5-17.
Figure 5-17. Fuel Bowl Removed from Carburetor.
NOTE: Further disassembly of fuel bowl is not
necessary unless the Accelerator Pump Kit
24 757 47-S, or Fuel Solenoid Kit 24 757 45-S
(obtained separately), are also being installed.