


Garmin G1000 Pilot’s Guide for the Beechcraft A36/G36
190-00595-01 Rev. B54
FLIGHT INSTRUMENTS
SYSTEM
OVERVIEW
FLIGHT
INSTRUMENTS
EIS
AUDIO PANEL
& CNS
FLIGHT
MANAGEMENT
HAZARD
AVOIDANCE
AFCS
ADDITIONAL
FEATURES
APPENDICESINDEX
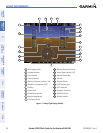
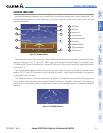
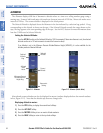
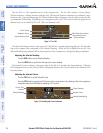
ALTIMETER
The Altimeter displays 600 feet of barometric altitude values at a time on a rolling number gauge using a
moving tape. Numeric labels and major tick marks are shown at intervals of 100 feet. Minor tick marks are at
intervals of 20 feet. The current altitude is displayed in the black pointer.
The Selected Altitude is displayed above the Altimeter in the box indicated by a selection bug symbol. A bug
corresponding to this altitude is shown on the tape; if the Selected Altitude exceeds the range shown on the
tape, the bug appears at the corresponding edge of the tape. See the AFCS Section for more information about
how the G1000 uses the Selected Altitude.
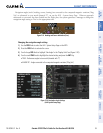
Setting the Selected Altitude:
Turn the
ALT SEL
Knob to set the Selected Altitude in 100-ft increments (if baro-min reference is set, the selected
altitude can be set in 10 feet increments to match the baro-min value).
If an altitude is set in the Minimum Descent Altitude/Decision Height (MDA/DH), it is also available for the
altitude preslector Selected Altitude.
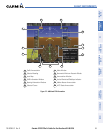
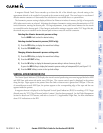
Figure 2-12 Altimeter (Metric Units)
Figure 2-11 Altimeter
Selected
Altitude
Altitude
Trend
Vector
Current
Altitude
Barometric
Setting
Selected
Altitude
Bug
Minimum Descent
Altitude/Decision
Height Bug
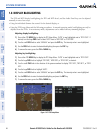
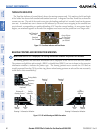
Selected and current altitudes can also be displayed in meters (readouts displayed above the normal readouts
in feet; Figure 2-12). Note that the altitude tape does not change scale.
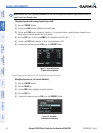
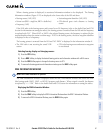
Displaying altitude in meters:
1) Press the PFD Softkey to display the second-level softkeys.
2) Press the ALT UNIT Softkey.
3) Press the METERS Softkey to turn on metric altitude readouts.
4) Press the
BACK
Softkey to return to the top-level softkeys.