


SERVICING THE AT10.1
53
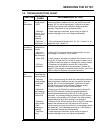
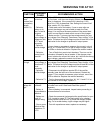
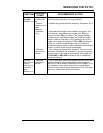
SYMPTOM
PROBABLE
CAUSE
RECOMMENDED ACTION
Charger
never
reaches float
(or equalize)
voltage
(within 1%)
1. Current limit
set too low
2. Defective
battery or dc
load, or load is
too great
3. Wrong ac
input voltage, or
voltage too low,
or T1 wired
incorrectly
4. Defecive
rectifier bridge
5. Defective
control circuit
board A1
1. If the AT10.1 is not in the Edit mode, press the EDIT/ENTER
key five times, until the meter display flashes the current limit
value (in Amperes). If the current limit is less than 110%,
adjust it to 110% as described. See Setting the Current Limit
Value, section 2.3.5 for details.
2. Check each cell of the battery. If one or more cells are
shorted, the charger may not be able to reach the Float
voltage. You may have the same problem if the normal load
current is more than the rated output current of the charger.
3. Make sure the T1 primary taps are wired correctly for your
input voltage. See Changing Transformer Taps, section 1.6 for
details. The actual ac input voltage must be at least 88% of the
rated value for the charger to produce full output power.
4. Use a clamp-on ammeter to measure the current in wire #
12 or # 11. If it less than 70% of the dc output current, one of
the SCRs or diodes is defective. Replace the rectifier module.
5. Turn off both front panel circuit breakers. Then turn on the
dc breaker, followed by the ac breaker. If the charger output
current is below the current limit value, but it still has the wrong
output voltage, replace the control circuit board.
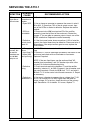
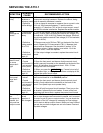
Input current
too high
1. Wrong ac
input voltage, or
transformer T1
wired
incorrectly
2. Defective
rectifier bridge
3. Defective T1
1. Be sure the T1 primary taps are wired correctly for your
input voltage. See Changing Transformer Taps, section 1.6 for
details. The actual ac input voltage must be at least 88% of the
rated value for the charger to produce full output power.
2. Disconnect wire # 24 from terminal E3 of the rectifier
assembly (near the left front of the enclosure). Restart the
charger. If You are able to measure output current, one of the
SCRs is defective. Replace the rectifier assembly.
3. Test by disconnecting wires from X1, X4, Y1 and Y2. If ac
input current is still too high, replace T1.
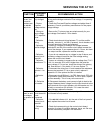
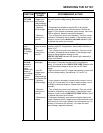
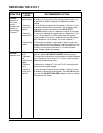
Output ripple
voltage too
high
1. Charger is
unfiltered
2. Battery is
disconnected or
defective
3. Battery too
small for
charger rating
4. One or more
defective filter
capacitors, C1
or C2
1. Verify by checking nameplate against the ordering code on
the inside front cover. Order and install filter option if
necessary.
2. Be sure battery is connected. Inspect battery according to
the manufacturer's instructions.
3. Check the measured ripple against the specification for your
AT10.1 model on page 70. The ripple rating is for a battery
whose Ampere-hours are four (4) times the charger ampere
rating. For a smaller battery, ripple voltage may be higher.
4. Test with capacitance meter; replace as necessary.