


SERVICING THE AT10.1
50
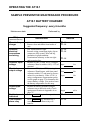
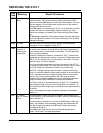
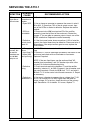
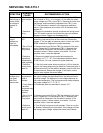
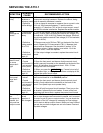
SYMPTOM
PROBABLE
CAUSE
RECOMMENDED ACTION
DC breaker
trips after a
few minutes
1. Loose
connection to
breaker
2. Open SCR
3. SCR not
controllable
4. Defective
control circuit
board A1
1. Check and tighten connections as required.
2. Use a clamp-on ammeter to measure the current in wire #
12 or # 11. If it less than 70% of the dc output current, then
one of the SCRs or diodes is defective. Replace the rectifier
module.
3. Disconnect wire # 24 from terminal E3 of the rectifier
assembly (near the left front of the enclosure). Restart the
charger. If You are able to measure output current, one of the
SCRs is defective. Replace the rectifier assembly.
4. If the front panel meter shows more than 110% of rated dc
current, the control board may be defective. Disconnect wire #
24 as above. If the output current goes to zero, replace the
control board.
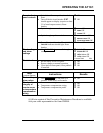
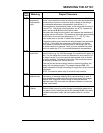
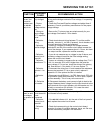
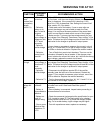
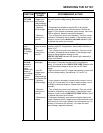
No output
current, but
ac and dc
breakers are
on; AC ON
lamp is out
1. AC supply
failure
2. Input fuse F1
is blown (480
Vac input only)
3. Defective
wiring
4. Defective
transformer T1
1. If AC ON indicator is out, check feeder circuit breaker or
fuse.
2. Remove
F1 from its fuseholder (located on the bottom of the
enclosure) and check with an Ohmmeter or fuse tester.
Replace if required.
NOTE: If the new fuse blows, see the sections titled "AC
breaker trips immediately" and "AC breaker trips after a few
minutes" for further troubleshooting hints.
3. Check terminals and wiring between T1 and the rectifier
assembly, inductor L1, dc filter (if present), the dc breaker, and
the output terminals. Check wire # 29 from T1-Y1 and wire #
28 from T1-Y2 to the control circuit board connector J1. Repair
as necessary.
4. Use an ac voltmeter to measure the ac voltage from T1-X1
to X4. It is normally 50% to 80% higher than the rated dc
output voltage. If it is too low, check the wiring of the primary
taps. See section 1.6 for details. If it is zero, replace T1.