


OPERATING THE AT10.1
32
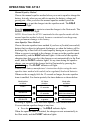
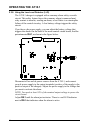
2.3.3. Setting the Equalize Timer
• Press the EDIT/ENTER key until the EQLZ HRS REMAINING,
MANUAL TIMER and AUTO EQLZ TIMER indicators light, and the
display flashes the present value of the equalize timer duration in hours.
Press and release the UP or DOWN key to increase or decrease the value in
the display by one count, or press and hold the UP or DOWN key to scroll
the value in the display upward or downward. When the display shows the
equalize time, in hours, that you want to set, release the UP or DOWN key.
If you go past the number of hours you want, press the UP or DOWN key
again to reach the number you want to set.
If you set the equalize time to zero hours, the equalize mode is disabled.
• Press the EDIT/ENTER key. The new equalize timer duration is saved
internally. The timer setting works for both the manual timer and the
auto-equalize timer.
If you want to adjust the alarm settings, skip to section 2.3.4.
OR
If you want to exit the Edit mode now, press the EDIT/ENTER key three
more times until the charger returns to normal operation.
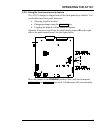
2.3.4. Setting the Alarms
After you save the equalize timer setting, the Edit mode automatically
prompts you to adjust the high dc voltage and low dc voltage alarms.
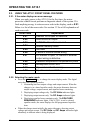
There is a red indicator on the front panel of the AT10.1 for each of the
following alarm conditions:
• High DC Voltage
• Low DC Voltage
• DC Output Failure
• AC Input Failure
• Ground Fault Detection (+)
• Ground Fault Detection (-)
The indicators light immediately when an alarm occurs. The AT10.1 also
has a summary alarm relay with one form C contact rated 0.5A / 125
Vac/Vdc. If an alarm condition lasts for 30 seconds or longer, the
summary alarm relay contact transfers. When the alarm condition is
corrected, the relay and all indicators reset automatically. The relay
contact also transfers if the AT10.1 detects certain errors, and displays
E 03, E 06, E 07 or E 10 on the front panel meter.