


OPERATING THE AT10.1
37
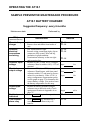
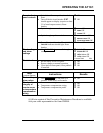
2.3.7. Adjusting the Voltmeter Accuracy
The AT10.1 voltmeter is adjusted at the factory to display the actual
output voltage within ±1%. If you replace any component that affects
meter accuracy, such as the main control PC board or R4, you should
readjust the meter. This adjustment procedure is different from all others,
because the meter reading remains constant, while the output voltage of
the charger changes. Do this adjustment with a fully charged battery and
with no load connected.
First, use the Edit procedure to adjust the float voltage to the desired
value. See section 2.3.2 for instructions on setting the float voltage.
Second, press and hold the UP key, then press the EQLZ MTHD key.
The DC VOLTS METER MODE indicator will light, and the meter display
flashes the output voltage reading. Measure the output voltage of the
AT10.1 using a dc meter accurate to ±0.25% or better.
While watching the meter connected to the AT10.1 output (not the front
panel meter), press the UP or DOWN key until the actual output voltage
matches the float setting on the front panel meter.
Each time you press UP or DOWN, you change the AT10.1 output voltage
by a small amount. Continue to press UP or DOWN until the actual output
voltage agrees with the front panel reading within ±1%
NOTE: Allow one or two seconds for the output voltage to stabilize
each time you press the UP or DOWN key.
When you are finished adjusting the output voltage, the AT10.1 waits 5
seconds, then the display returns to normal operation.