


Chapter 1 ATCA-C110/1G Baseboard Preparation and Installation
ATCA-C110/1G Installation and Use Manual
7
REVIEW COPY
Hardware Upgrades and Accessories
Hardware upgrades and accessories allow an easy and cost-efficient way to adapt the system
board to your application needs.
The following hardware upgrades and accessories are available:
■ Fabric Interface Module - refer Installing the FIM on ATCA-C110/1G Board on page 7
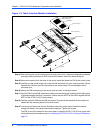
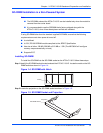
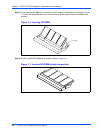
■ SO-DIMM Memory Modules - refer Installing SO-DIMM on page 9
■ AMC Modules - refer Installing an AMC Module in a Powered System on page 12
The installation procedure for each hardware upgrade and accessory is described in the
sections below.
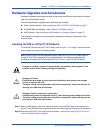
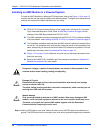
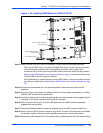
Installing the FIM on ATCA-C110/1G Board
To install the FIM on the ATCA-C110/1G board, refer to Figure 1-3 on page 8, read all cautions
and warnings and perform the following steps.
Note Since the FIM is not hot-swappable always install the ATCA-C110/1G when power is
turned off. The FIM is assembled on the delivered board. The following steps detail the
procedures to replace the FIM onboard the ATCA-C110/1G, in case of any FIM failure.
Warning
Dangerous voltages, capable of causing death, are present in this equipment. Use
extreme caution when handling, testing and adjusting.
!
Caution
Caution
Damage of Circuits
Electrostatic discharge and incorrect board installation and removal can damage
circuits or shorten their life.
Therefore, before touching boards or electronic components, make sure that you are
working in an ESD-safe environment.
!
Caution
Caution
Damage to Board or electronic components
Avoid touching areas of integrated circuitry; static discharge can damage the circuits.
Therefore, before touching boards or electronic components, make sure that you are
working in an ESD-safe environment.
Step 1:Attach an ESD strap to your wrist. Attach the other end of the ESD strap to the chassis as a
ground. The ESD strap must be secured to your wrist and to ground throughout the procedure
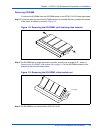
Step 2:Remove the ATCA-C110/1G board from the chassis - refer to Removing the ATCA-C110/1G
from a Powered Chassis on page 21.