


II
No doubt you are going to read this entire manual just
as soon as you possibly can. But just to get an idea of
how easy the KLN 90B is to operate, the following oper-
ational preview is presented. This operational preview
assumes the KLN 90B has been properly installed, the
unit was previously operational in the same general
geographical location, and that no peripheral equipment
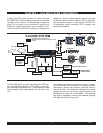
interfaced with the KLN 90B (such as external HSIs,
CDIs, autopilots, RMIs, fuel flow systems, moving map
display, etc.) is to be used at this time. If you are using
this operational preview in flight, do so only in good VFR
conditions and only with an alternate means of naviga-
tion available to cross-check position.
1. Push the power/brightness knob located in the
upper right corner of the unit to the “in” position.
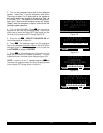
2. After a few seconds of warm up, the screen will
show a Turn-On page with the words SELF TEST
IN PROGRESS at the bottom of the page. Rotate
the power/brightness knob to select the desired
screen brightness. After a few seconds the Turn-
On page will automatically be replaced with the
Self Test page. (Note: If the KLN 90B is being
used in the take-home mode, a Take-Home
Warning page is displayed before the Self Test
page and must be acknowledged by pressing
E.) The Self Test page is recognizable because
it shows the date and time on the right side. If the
date and time are incorrect by more than 10 min-
utes, refer to section 3.2 of this manual. The bot-
tom left side of the Self Test page must display
ANNUN ON to indicate that the KLN 90B has
passed an internal self test.
In most KLN 90B installations the first two charac-
ters of the altimeter setting BARO field will be
highlighted in inverse video (dark characters on a
light background) on the right side of the screen.
This area of inverse video is called the cursor.
Use the right inner knob to select the correct first
two characters of the altimeter setting. Next, turn
the right outer knob one step clockwise to position
the cursor over the third character of the altimeter
setting. Use the right inner knob to select the cor-
rect number. Once again turn the right outer knob
one step clockwise to position the cursor over the
last character of the altimeter setting. Use the
right inner knob to complete entering the correct
altimeter setting.
Turn the right outer knob clockwise to position the
cursor over the word APPROVE? if the cursor is
not there already. Press E to approve the Self
Test page. (Note: If the KLN 90B is installed for
VFR only operation, a VFR only warning page is
diplayed after the self test page has been
approved. This warning page must be acknowl-
edged by pressing E .)
3. A Database page is now displayed showing the
date the data base expires or the date it expired.
Press E to acknowledge the information dis-
played on this page.
4. A page displaying the letters PRESENT POS at
the top will now be on the left side of the screen.
In a couple minutes or less, this page will display
the aircraft’s present position. It shows the posi-
tion both in latitude/longitude and in terms of the
radial and distance from a nearby VOR. Verify
that the position is correct before proceeding.
5. Press the D button. A page with the words
DIRECT TO is now displayed on the left.
In step 6 you will enter the ICAO identifier of the
destination airport. The identifier will have a “K”
prefix for a Continental U.S. airport, a “C” prefix
for a Canadian airport, or a “P” prefix (in many
cases) for an Alaskan airport if the identifier is all
letters. For example, LAX becomes KLAX. For
these countries if the identifier contains any num-
bers, there is no prefix. For example, TX04 is
entered TX04. For other areas of the world the
airport identifier entered should be identical to
how it is charted.
6. Rotate the left inner knob until the first character
of the airport identifier is displayed. Turn the left
outer knob one step clockwise to move the flash-
ing segment to the second character position.
Rotate the left inner knob to select the second
character of the identifier. Use this procedure to
enter the complete airport identifier.
7. Press E. The right side will display a page
showing the identifier, name and position of the
airport just entered. Confirm that the correct air-
port is displayed. Press E a second time to
approve the airport data.
8. A Navigation page is now on the right side of the
screen. It displays the distance, ETE, and bearing
to the destination airport. In addition, it displays
groundspeed and a course deviation indicator. If
the left inner knob is rotated one step counter-
clockwise, you will get an enlarged Navigation
page occupying the entire screen.
Rev 1
PREVIEW OF OPERATION