


Section 5
Page 107
Cleaning and Maintaining Submerged Area/Velocity Sensors
5.6.5 Hydrophobic Filter Replacement Procedure
1. Using a deep-well hex socket (11 mm), unscrew the hex-head tubing
nipple from the top of the canister and discard the old filter.
2. Discard any remnants of Teflon tape from the nipple’s threads. Reapply
two turns of Teflon tape (Cat. No. 10851-45) to the threads, pulling the
tape into the threads until it conforms to the shape of the threads.
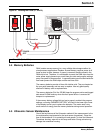
3. Place a new filter (Cat. No. 3390) over the hole. Make sure that the
smooth side of the filter faces the inside of the canister. See Figure 49.
4. Place the threaded nipple on top of the filter.
5. With a slight pressure, press the filter into the hole with the nipple threads
and begin threading the nipple into the hole. The filter will deflect upward
and feed completely into the thread until it disappears. The filter must
rotate with the nipple as it is threaded into the cap. If it does not, it is torn.
Start over with a new filter.
6. Inspect the installation. In the upper cap, a small, dim light spot should be
visible when held up to the light. A bright spot indicates a torn filter. Start
over with a new filter.
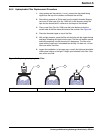
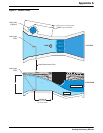
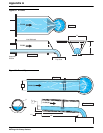
Figure 49 Replacing the Hydrophobic Filter
1. Filter, smooth side down 2. Hex-head tubing nipple 3. Finished assembly.
12
3