JKSSS+ Series - 92
JKSSS+ Series 2.3 - 4.2KV
1. Remove white jumper wires on the gate drive board and make a note
of their placement.
2. Remove both 7/16 bolts and the singular 10 - 32 screw at the top of
gate drive board and lift off the board.
3. To remove the MOV board, remove the SCR gate/cathode leads (thin
red and white wires) and the white jumper wires attached to them.
Make a note as to how they were connected. Unbolt the ½” fasteners
as well.
4. At this point, all boards should now be removed from the aluminum
heat sink assembly.
5. Make a note (or drawing) of how each of the SCRs are oriented within
the heat sink. If factory supplied replacement SCRs and heatsinks are
used, the following steps are not required.
6. Loosen and carefully remove the ½” feed-through bolt and two black
springs that hold the assembly together and turn it on its side.
7. Remove the two (2) SCRs in the top layer, making certain to note that
the SCRs are not facing the same direction.
8. Remove the two (2) SCRs in the bottom layer, also making certain to
note that the SCRs are not facing the same direction.
9. Clean the heat sink surface area thoroughly and reapply some thermal
heat sink grease sparingly to the SCRs mating surfaces.
10. Please note that replacement SCRs are in matched sets of four and as
such, please try to keep the matched sets within the same phase.
11. Now, take any two SCRs from a set and place them on the heat sink in
the same direction as the old SCRs were, ensuring that the dimple in
the center of the SCR is properly placed onto the center pin of the heat
sink assembly. Place the next level of heat sink bar on the mounted
SCRs. Note: There is a difference in the heat sink bars. The center bar
has more holes drilled in it for mounting the circuit boards on it.
12. Now replace the other two (2) SCRs by repeating steps 10 and 11.
13. Next, carefully sandwich the SCRs and turn the stack over so the heat
sink bars are vertical and run the center bolt through the springs and
hand tighten the nut on the center bolt assembly.
14. Then make approximately 3 and ½ full revolutions on the nut to create
the appropriate amount of compression force. You can tell if there is
enough compression force applied to the heat sink by the fact that the
force needed to turn the nut will suddenly increase.
15. Finally, reinstall all boards in the same manner in which they were
removed.
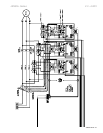
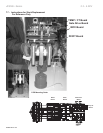
16 Refer to drawing PCB for disassembling and reassembling the stack
assembly.


