


ENGLISH
USER MANUAL
32
33019476(3)2010-02 A RS 2200
WHEEL REPLACEMENT
Check that the machine is on a solid and level ground, especially if the hopper is full.1.
Turn off the engine, by turning the ignition key (6, Fig. D) counterclockwise, to the end of stroke, then remove it.2.
Engage the parking brake (3, Fig. D).3.
Check that the machine cannot move with one wheel lifted (the parking brake operates only on the front wheels). If necessary 4.
keep the machine stationary by placing wedges on the wheels contacting the ground.
Use an hydraulic jack with a minimum lifting capacity of 3 tons.5.
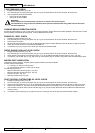
Rear wheel removal/installation
Place the jack (1, Fig. R) (not equipped) under the relevant housing (2) marked by a label, under the rear frame (3), as shown 1.
in the fi gure.
Activate the jack (1, Fig. R) carefully by using the lever (9) and lift the wheel (4) until it is slightly detached from the ground.2.
Remove the mounting nuts, then remove and replace the wheel.3.
Install the wheel by performing steps from 6 to 8 in the reverse order. Wheel mounting nut tightening torque: 200 N·m4.
Front wheel removal/installation
Place the jack (5, Fig. R) (not equipped) under the relevant housing (6) marked by a label, under the front frame (7), as shown 1.
in the fi gure.
Activate the jack (5, Fig. R) carefully by using the lever (10) and lift the wheel (8) until it is slightly detached from the ground.2.
Remove the mounting nuts, then remove and replace the wheel.3.
Install the wheel by performing steps from 10 to 12 in the reverse order. Wheel mounting nut tightening torque: 200 N·m.4.
TOWING THE MACHINE
To tow the machine, proceed as follows.
Empty the hopper. If it contains a small quantity of material, it is not necessary to empty it.1.
Disengage the parking brake (3, Fig. B).2.
Turn off the engine, by turning the ignition key (6, Fig. B) counterclockwise, to the end of stroke, then remove it.3.
Tow the machine for a short distance, fasten the machine to the towing hook (28, Fig. F) marked by the proper label.4.
CAUTION!
Proceed at very low speed when towing.
Tow the machine for a long distance, before fastening the machine to the towing hook (28, Fig. F), loosen the by-pass screw 5.
(2, Fig. T) on the drive system pump (1, Fig. T).
CAUTION!
Proceed at very low speed when towing.
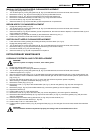
USING THE CAMERA KIT (optional)
The video-camera system can be turned on manually or automatically with the drive pedal.
To adjust the position of the display (1, Fig. AO) unlock the lever (3) and lock it again when the desired position is reached.1.
Manual activation2.
When the machine is in “neutral” (drive pedal not pressed), to turn on the video system (1, Fig. AO) and the cameras (4 •
and 5), press the switch (2) when the ignition key (6, Fig. D) is inserted. The display shows the front and rear cameras
sequentially.
Automatic activation3.
When the ignition key (6, Fig. D) is inserted, the video (1, Fig. AO) and the cameras (4 and 5) turn on by turning the gear •
selector (11) forward/backward. The display shows the images of the front or rear camera depending on whether the
selector (11, Fig. D) is set to forward or reverse gear.
For the functions of other switches on the display, refer to the camera kit Manual.4.