


5.49
BODY / STEERING / SUSPENSION
5
9923142 - 2011 RANGER RZR / RZR S / RZR 4 Service Manual
© Copyright 2010 Polaris Sales Inc.
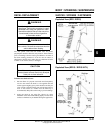
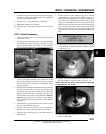
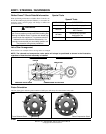
12. Clamp the body cap of the shock securely in vise with shaft
side up.
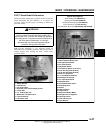
13. Gently tap the reservoir end cap with a rubber mallet to
expose the wire retaining ring. Locate the end of the ring
and push inward with fingertip. Remove the retaining ring.
A scribe or dental pick can also be used for this step, but
use extreme caution not to scratch the bore of the reservoir
tube (Fig. 4).
14. Use pliers to grab flats of the gas valve of reservoir cap.
Extract cap from reservoir tube using a rocking or twisting
motion. Set reservoir cap aside on a clean, lint free paper
towel.
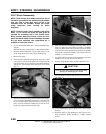
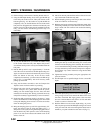
15. Use the appropriate size wrench to loosen the bearing
assembly (Fig. 5).
Unscrew the bearing assembly completely from the body
tube. Remove the shaft assembly from the body tube, and
place on a clean, lint free paper towel. Remove the shock
from the vise and pour shock oil from body tube into a
proper disposal container.
NOTE: DO NOT RE-USE OLD SHOCK OIL.
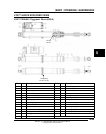
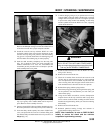
16. Clamp the body cap of the shock securely in vise with the
open end of the body tube pointing up.
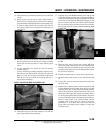
17. Align the slot of the IFP Depth Setting Tool with the end
of the IFP (Internal Floating Piston). Engage the IFP by
rotating the tool 90 degrees (Fig. 6). Gently pull the IFP out
of the reservoir tube using the IFP Depth Setting Tool, and
place it on a clean, lint free towel. Remove the shock from
the vise and pour shock oil from body and reservoir tubes
into a proper disposal container. DO NOT RE-USE OLD
SHOCK OIL.
18. Using the 1/8” Hex Tool, remove the IFP bleed screw from
the IFP.
19. Clean the body tube, reservoir tube, and the IFP using
solvent. Dry with compressed air in a well ventilated area.
If compressed air is not available, dry parts using clean, lint
free paper towels and let sit in a well ventilated area to allow
the solvents to evaporate.
20. Set body assembly aside on a clean, lint free paper towel.
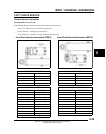
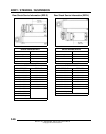
21. Clamp the shaft eyelet securely in vise with the piston end
up.
22. Using a 9/16” wrench, remove the piston lock nut from the
end of the shaft.
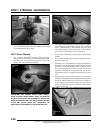
23. Hold the tip of a phillips head screwdriver against the end
of shaft. Hold the piston assembly under the top-out plate
and lift upwards (Fig. 7). Slide the piston assembly onto the
shaft of the Screwdriver. Pull the Screwdriver away from
shock shaft while supporting the piston assembly. Slide a
12” tie wrap through the entire piston assembly. Secure the
two ends of the zip tie together and remove the screwdriver.
There are many pieces to the piston assembly, and the
assembly order of these pieces is critical to the proper
performance of your shock. This step ensures that the
proper order is kept. Place piston assembly on a clean, lint
free paper towel.
Figure 4
Figure 5
Figure 6