


TAKEOFF TOUR
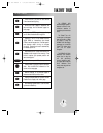
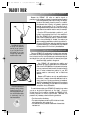
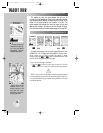
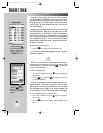
Hollow signal strength
bars will appear on the sta-
tus page while the receiver
collects satellite data. Once
the data is collected and the
satellite is ready to use, the
signal strength bar changes
to solid.
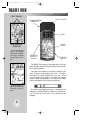
When the GPSMAP 195
is turned on a welcome
screen appears briefly while
the receiver conducts an
internal self test. The same
PP
key is used to turn the
receiver on or off.
14
INITIALIZING THE RECEIVER (cont.)
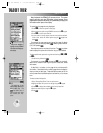
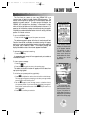
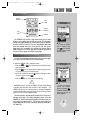
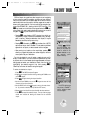
The GPSMAP 195 will now begin searching for the
appropriate satellites at your present position and should acquire a fix
within a minute or so. While the receiver searches for satellites, a
flashing satellite icon will appear at the left-hand side of the status
bar. A signal strength bar will also appear for each satellite received,
with the appropriate satellite number under each bar. The progress of
satellite acquisition is shown in three stages:
• No signal strength bars— the receiver is looking for the satellites
indicated.
• Hollow signal strength bars— the receiver has found the
indicated satellite(s) and is collecting data.
• Solid signal strength bars— the receiver has collected the
necessary data and the satellite(s) is ready for use.
Once the receiver has collected information from at least three
satellites, the flashing satellite icon on the status bar will remain on
steadily, and the GPSMAP 195 is ready for use.
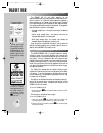
The GARMIN GPSMAP 195 is a powerful electronic charting/
navigating system that provides detailed chart coverage and
convenient control of many advanced features right from the moving
map display. The tour is designed to take you through the basic
pages and functions of the system, first by demonstrating the normal
process of obtaining a position fix, and then by using the simulator
mode. Once you’re familiar with the main pages and functions of the
unit, refer to the reference section for instructions on performing spe-
cific tasks and functions.
The Takeoff Tour assumes that the receiver has been properly
installed and initialized, and you have not changed any of the default
unit settings. If you have changed any settings (position formats,
units of measure, etc.), the descriptions and pictures in the tour may
not match your configuration.
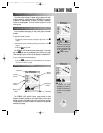
Now that you’ve initialized the receiver and obtained a position fix,
let’s look at the normal power on sequence and see how it differs
without the initialization steps. For starters, we’ll need to turn the
GPSMAP 195 off for a moment.
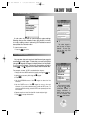
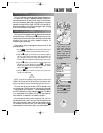
To turn the GPSMAP 195 off:
1. Press and hold the
P
key for approximately one second, until the
screen is blank.
Now we can turn the receiver back on again.
To turn the GPSMAP 195 on:
1. Press and hold the
P
key until the power tone sounds. The
welcome page will appear while the unit conducts a self test.
2. Once the self test is complete, press the
J
key to acknowledge
the aviator’s warning.
TURNING THE GPSMAP 195 ON & OFF
gps 195 manual C 7/1/99 4:48 PM Page 14