87
However, line and area features differ from grid features in
two important ways:
- The positions making up line and area features mark the
locations of real things like roads, lakes, etc. But the
points making up a grid feature are imaginary target
locations that you navigate to.
- The attributes you record for a road or a lake pertain
equally to each of the point positions making up feature,
but you typically record different descriptions at each
grid point making up the grid feature.
Setting up a Grid Feature in a Feature Library file
Use the Feature Library Editor window to set up a grid fea-
ture. To add a grid feature to the feature library:
- Right-click on the name of the feature library and select
the
Insert Feature option. Then select Grid as the feature
type
- Click on the
Add button, then on the Close button.
- Then define the attributes of the point feature that you
will record at each of the grid points. Do this as you
would for any point, line or area feature (see pages 80
and 81). Typically, these are text-type attributes for
visual observations and numeric-type attributes for mea-
surements made with instruments. But it is also possible
to record observations using a menu-type of attributes.
Editing the Grid Properties
When you are done adding attributes to the grid feature, you
will see the grid symbol and the name of the grid feature in
the tree display of the feature library. If you click on the
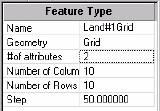
name of the grid feature, you will see a two-column table on
the right labeled “Feature Type.” This is where the default
values of the grid feature are indicated. If you want to change
any of these values, double click on the value and type in a
new one.
Grid properties table
