


GPSMAP 620 and GPSMAP 640 Owner’s Manual 63
Automotive Mode: Managing Files
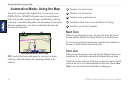
Copying Automotive Data to the Unit
Using MapSource
1. Check your MapSource version on your computer by clicking
Help > About MapSource. If the version is older than 6.12.2,
update to the most-current version by clicking Help > Check for
Software Updates or check the Garmin Web site at www
.garmin.com.
2. Connect a mini-USB connector to the back of the GPSMAP 620
or GPSMAP 640.
3. Connect the larger end of the cable to an available USB port
on your computer. Your device and memory card appear as
removable drives in My Computer on Windows computers and
as mounted volumes on Mac computers.
NOTE: Some operating systems or computers with
multiple network drives cannot display the GPSMAP 620 or
GPSMAP 640 drives. See your operating system Help le to
learn how to map the drives.
4. From MapSource, click on Transfer > Send to Device.
5. From the Send to Device window, select the drive for the
GPSMAP 620 or GPSMAP 640, and the types of data you want
to copy to your device.
6. Click Send. MapSource transfers a le named Temp.gpx le to
the Garmin\GPX directory.
7. Click the Safely Remove Hardware icon in your toolbar (system
tray), or drag the volume icon to the Trash on Mac computers.
8. Unplug your GPSMAP 620 or GPSMAP 640 from your
computer.
Deleting Automotive Files
Connect the GPSMAP 620 or GPSMAP 640 to your computer, and
open the device or SD card drive/volume. Highlight the le you
want to delete, and press the Delete key on the computer keyboard.
Notice
If you do not know the purpose of a le, do not delete it. Your
device memory contains important system les that should not be
deleted.