


Platform Installations and Upgrades
Replacing the Light Pipe
Light pipe replacement instructions are included as part of the instructions to replace the
front panel I/O board. To replace the light pipe using an existing front panel I/O board, use
the instructions under the following headings, replacing the existing front panel I/O board
instead of installing a replacement board:
“
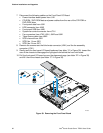
Removing the Front Panel I/O Board”
“
Replacing the Light Pipe” (the steps below)
“
Installing the Front Panel I/O Board”
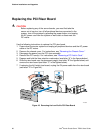
1. Note the position of the light pipes so that you will be able to correctly position it on the
Front Panel I/O Board during the re-installation process. The pipes extend outward
from the Front Panel I/O Board.
2. Remove the light pipe by gently pressing the four plastic clips from the underside of
the Front Panel I/O Board until the bottom of the clips are flush with the bottom of the
Front Panel I/O Board.
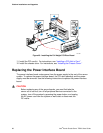
3. Gently ease the light pipe from the Front Panel I/O Board.
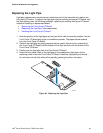
4. Insert the four plastic clips on the light pipe or the replacement light pipe into the
matching holes in the new Front Panel I/O Board. Insert the clips gently and evenly –
do not insert one clip fully without first partially pressing the others into place.
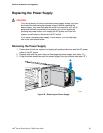
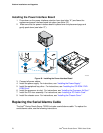
TP01667
Figure 40. Replacing the Light Pipe
Intel
®
Carrier Grade Server TIGI2U User Guide 63