Platform Installations and Upgrades
Installing the Power Supply
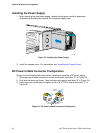
1. When inserting the new power supply, make sure the green handle is depressed
downward while sliding the module into the power supply cage.
TP01654
Figure 33. Installing the Power Supply
2. Install the chassis cover. For instructions, see “Installing the Chassis Cover.”
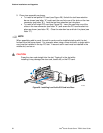
DC Power In Male Connector Configuration
Please use the following instructions when installing or replacing a DC power supply.
1. Slide open top of male connector to reveal screw holes (see letter “A” in
Figure 34).
2. Strip wire insulation as shown. Note minimum wire gauge (see letter “B” in
Figure 34).
3. Insert each wire all the way and tighten to 24 in-lb (2.7 N-m) torque (see letter “C” in
Figure 34).
Strip Wire 0.625"
(16mm)
Min. Wire
14 AWG
C
A
B
#2 Phillips*
Screwdriver
Figure 34. DC Power In Male Connector Configuration
Intel
®
Carrier Grade Server TIGI2U User Guide
56


