


Garmin aera 500 Series Pilot’s Guide
190-01117-02 Rev. A
Appendix D
141
Overview GPS Navigation Flight Planning Hazard Avoidance Additional Features Appendices Index
The following features are now available on the radio:
Remote frequency lists for departure, enroute, and arrival airports.•
Nearest VOR frequencies (SL30 only).•
The aera can also directly tune a standby frequency.
Selecting a standby comm frequency:
1)
From the 'Home' Screen, touch WPT Info > Freq Tab
2)
Touch the desired frequency from the list. The frequency is now tuned in
standby.
Or:
a)
If the frequency has additional information (denoted with an *). Touch
the desired frequency from the list.
b)
Touch the 'Tune' Button.
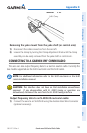
INFORMATION ABOUT USB DRIVERS
When connecting the aera to a USB port, the computer prompts you to locate the
destination of the drivers for the device (a USB drivers CD is included). Only install the
drivers once. After the drivers are installed, your computer always detects your aera
when it is connected. USB driver updates can be found at www.garmin.com.
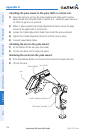
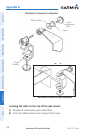
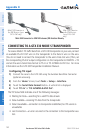
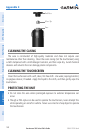
CONNECTING THE GXM 40 ANTENNA (aera 510 & 560)
Connect the GXM 40 antenna to the aera to access XM Satellite Weather and XM
Radio. For more information about the GXM 40 antenna, see the GXM 40 Owner’s
Manual.
NOTE:
You must subscribe to XM Radio and/or XM WX Satellite Weather to
use the XM Radio and/or XM Weather features on your aera 510 or 560.
Connecting the GXM 40 antenna:
1)
Position the antenna where it has a clear view of the sky. This can be on
the outside of the vehicle or behind the windscreen.
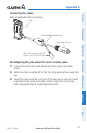
2)
Plug the GXM 40 cable into the Mini-USB Connector on the appropriate
Aviation Mount.