


70
Basics
Section
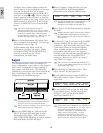
You don’t need to make further settings for
Zone 4 since it is not intended for an internal
Part and has already been set to output
performance information via the MIDI OUT
connector in steps 5 to ). The key range of
Zone 4 matches to that of Zone 3 so that solo
performance made in that range will be sent on
MIDI channels 3 (from Zone 3) and 4 (from
Zone 4) via MIDI OUT to an external MIDI
device.
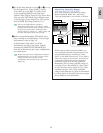
You can set additional Part settings in
Performance Edit Mode. If you have a trouble
possibly associated with these settings, such as no
sound from a specific Part, confirm any Part
settings related to volume, etc. Refer to Page 130
for more information about Part settings.
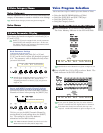
^Before exiting Performance Edit Mode, store
above settings in a Performance. For storing a
Performance, refer to Page 141.
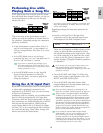
In Performance Play Mode, recall the
Performance you have just stored. Simply
pressing the [MASTER KEYBOARD] key
activates or deactivates the 4-Zone
configuration you made above.
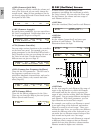
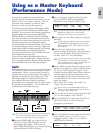
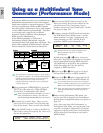
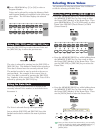
Layer
The illustration below shows an example of a
Layer configuration. Layer refers to two separate
Parts with a overlapped key range, enabling to
play unison with these Parts. The following
example is to play unison with Voices selected for
Part 1 and Plug-in 1 Part. You can make this
configuration in the following steps.
Before you set up a Layer configuration in the
following procedure, edit and prepare necessary
Voices for layers in associated Edit Modes.
Plug-in Voices are available only when you attach
an optional Plug-in Board (Page 108).
1Press the [PERFORM] key, followed by the
[EDIT] key (each LED will light) to enter
Performance Edit Mode. Then, press the
[MASTER KEYBOARD] key to activate Master
Keyboard Mode (its LED will light).
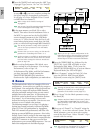
2Select “Common” using the Knob [A], then
open the GEN M. Kbd (General Master
Keyboard) screen using the [PAGE] knob.
Turning the [PAGE] knob while holding down the
[SHIFT] key enables you to scroll though
parameters in the Menu screens (Page 121).
3Select “layer” for the Mode parameter using the
Knob [B].
If Master Keyboard Mode is deactivated (without
the [MASTER KEYBOARD] key pressed), the
Mode parameter value will be shown in brackets
(like “(layer)”).
4Use Knobs [C] and [1] to respectively set MIDI
transmit channels for the Lower and Upper
parameters. Note that Lower and Upper refer
to two Parts (Zones) to be layered together.
These channel settings can create and send
performance information on two separate
channels to the internal tone generator and an
external MIDI device via the MIDI OUT
connector. Here we set “Ch01” for “Lower”
and “Ch02” for “Upper.”
You can also use the PROGRAM/PART keys [1]
to [16] to select MIDI channels for the Lower and
Upper Parts (Page 123).
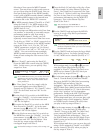
5Turn the Knob [A] and select a Part. First
select “Part01” for the Upper Part.
6Use the [PAGE] knob and open the MIX Vce
(Mix Voice) screen. Select a Voice for the
Upper Part.
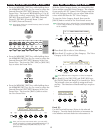
7Use the [PAGE] knob to open the LYR Mode
(Layer Mode) screen. Set the Layer (Layer
Switch) to “off” and the RcvCh (MIDI
Receiving Channel) to “1.”
If other Parts’ RcvCh (MIDI receive channels) are
set to the same ones assigned to two Parts, those
Parts will also sound when you play on the
keyboard. This might be troublesome if you
simply need two layered Parts. To mute
unnecessary Parts while you play on the
keyboard, set “RcvCh” for those Parts to “off.”
You can only play Voices from layered Parts.
LYRíMode) Mode Arp Layer RcvCh
Part01 poly on off 1
MIXíVce) Memory Number Ctgry Search
Part01 PRE1:128(H16)[Pf:GrandPiano]
GENíM.Kbd) Mode Lower Upper Point
Common split ch01 ch02 C 3