


145
Phrase Clip Mode
5Now follow the procedure according to the setting
made in step 3.
If set to “manual”:
Recording will begin when you press the [ENTER] key.
If set to “level”:
Press the [ENTER] key to enter Recording Standby state.
You will see the “Waiting for trigger” message displayed.
When the level of the input signal reaches or passes
the Trigger Level, recording begins automatically.
While recording, you will see the “Now recording...”
message displayed.
6Press the [EXIT] key to stop recording. The “Now
recording...” message will disappear.
If the memory becomes full, recording will
automatically stop, even before you press the [EXIT]
key.
7You can now audition the Clip just recorded by
pressing the Clip Key selected in step 2 while
holding the [REC] key.
8If you are not satisfied with the result, you can re-record
the Phrase Clip by pressing the [ENTER] key again.
9When you exit Phrase Clip Record Mode, the Phrase
Clip you have recorded will automatically be
assigned a new Clip Number and Clip Name, and
saved to memory (DRAM) along with the Clip Key
setting assigned in step 2.
)Repeat steps 1 to 9 to record new Phrase Clips.
Phrase Clip data held in memory (DRAM) will be lost if
you switch off your synthesizer. You should always save
important Phrase Clip data to Memory Card (Page 173).
A recorded Clip can be edited in its tones, applied
effects, assigned to a Clip Key from a Clip Kit in Phrase
Clip Edit Mode. It can also be copied or even deleted in
Phrase Clip Job Mode. The Clip Kit that includes the
recorded Clip will be selected (from four Clip Kits) and
assigned to the Phrase Clip Part in Performance Edit
Mode (Page 121).
Example 2: Recording a Phrase Clip
from the Internal Tone Generator
You can record a Voice, Performance, an existing Phrase
Clip or a Song as a new Phrase Clip.
1Select a Voice, Performance or Clip Kit in Voice Play
Mode, Performance Play Mode or Phrase Clip Play
Mode. If you wish to record a phrase of a Song, you
will need to prepare the Song file for playback and
select the appropriate Performance.
For a possibly best sound quality, you should maximize
the volume of the Voice, Performance or Phrase Clip that
you are recording.
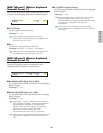
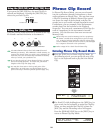
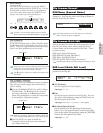
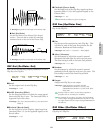
PCLP Rec) Source Trigger-level [EXIT]
<< Waiting for trigger... >> toStop
PCLP Rec) Source Trigger [EXIT]
<< Now recording... >> toStop
2While still holding down the [REC] key, use Knob
[C] or press a note on the keyboard to set the Clip
Key. When you release the [REC] key, you will see
the Recording screen.
3Select a recording source by specifying the value
(pclip, voice, or perform) for the Source parameter in
the Recording screen. Also select a method to start
recording in the Trigger parameter — “key” for
recording a Voice or Performance played by the
keyboard or “manual” for a specific phrase or
melody during playback of a song.
The recorded clip will automatically be assigned a vacant
Clip Number in memory (DRAM). Therefore, you will
not have to choose a Clip Number before recording.
4Press the [ENTER] key to enter Recording Standby
state. You will see the “Waiting for trigger” message
displayed.
5Now follow the procedure according to the setting
made in step 3.
If set to “key”:
Start playback of the song by pressing the SEQ PLAY
[START/STOP] key.
If set to “manual”:
Start playback of the song by pressing the SEQ PLAY
[START/STOP] key. Start recording of a Phrase Clip
at any necessary moment by pressing the [ENTER]
key.
While recording, you will see the “Now recording...”
message displayed.
6Press the [EXIT] key to stop recording. The “Now
Recording...” message will disappear.
If the memory becomes full, recording will automatically
stop, even before you press the [EXIT] key.
7You can now audition the Clip just recorded by
pressing the Clip Key selected in step 2 while
holding the [REC] key.
8If you are not satisfied with the result, you can re-record
the Phrase Clip by pressing the [ENTER] key again.
9When you exit Phrase Clip Record Mode, the Phrase
Clip you have recorded will automatically be
assigned a new Clip Number and Clip Name, and
saved to memory (DRAM) along with the Clip Key
setting assigned in step 2.
)Repeat steps 1 to 9 to record new Phrase Clips.
Phrase Clip and Clip Kit data held in memory (DRAM)
will be lost if you switch off your synthesizer. You should
always save important Phrase Clip and Clip Kit data to
Memory Card (Page 173).
After recording from the internal tone generator, the
recorded Phrase Clip will automatically be normalized
(Ratio = 100 %). For more information about
normalization, refer to Page 157.
A recorded Clip can be edited in its tones, applied effects,
assigned to a Clip Key from a Clip Kit in Phrase Clip Edit
Mode. It can also be copied or even deleted in Phrase Clip
Job Mode. The Clip Kit that includes the recorded Clip
will be selected (from four Clip Kits) and assigned to the
Phrase Clip Part in Performance Edit Mode (Page 121).