


157
Phrase Clip Mode
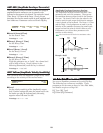
■ Start (Start Point)
Set the Start Point from which the Phrase Clip will
be played back. By finely adjusting the Start Point,
you can avoid playback of the noise before the Start
Point. This setting, however, does not eliminate the
noise in the original Clip.
❏ Settings: Depends on the length of the Phrase Clip.
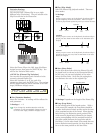
■ Loop (Loop Point)
Set the starting point of the looped section. With a
violin sound, for example, the Loop Point should be
set after the distinctive attack portion and at the
start of the sustained section of the sound. When
playing back this loop, the attack portion of the
violin sound is played back, followed by the looped
section corresponding with the sustained section of
the violin sound (between the Loop Point and the
End Point). On the other hand, if the sound does
not have a distinctive attack portion, the Loop Point
can be set to the same position as the Start Point.
❏ Settings: Depends on the length of the Phrase Clip.
■ End (End Point)
Set the End Point of the Phrase Clip’s looped section.
This can also be useful for removing unwanted noise
at the end of the Phrase Clip.
❏ Settings: Depends on the length of the Phrase Clip.
Details about the Start, Loop and End Points are given
on Page 150.
PCLP LoopRemix
The Phrase Clip data can be edited and a new Phrase
Clip can be automatically created with a new Loop.
The procedure is as follows.
The following Jobs are available only when the Phrase
Clip has been recorded in 16-bit format.
1Select the Phrase Clip by using Knob [A] to select
the target Clip Key or Knob [B] to set the Phrase Clip
Number.
You can also select the target Clip Key directly by
pressing its note on the keyboard.
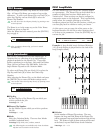
2Select the Type parameter which specifies the
section of the Loop to be changed. Five Types are
available.
3Select the Vari (Variation) parameter, which is the
degree of change to be applied to the Loop. Four
Variations (A to D) are available, each offering
increasing degrees of change.
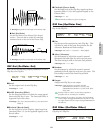
PCLP LoopRemix) Type Vari
JOB C 2:001[SmplName] 1 A
4When you press the [ENTER] key, you will see a
confirmation message. Press the [INC/YES] key to
execute the Loop Remix Job. The Job will be
canceled if you press the [DEC/NO] key.
5After executing the Loop Remix Job, you will see the
following Retry message.
At this screen, you can use the keyboard to audition
the Loop Remix. If you are not satisfied with the
result, try creating another Loop Remix by repeating
steps 2 to 4 but using different Variation settings.
6When you are satisfied with the result, press the
[DEC/NO] key. A new Phrase Clip will be created
and you will be returned to the first screen.
PCLP Normalize
You can normalize each Phrase Clip. This maximizes
the output level of the recorded Phrase Clip without
causing distortion.
To select each Phrase Clip, use Knob [A] to select the
Clip Key or Knob [B] to select the Phrase Clip Number.
After selecting the Phrase Clip, set the Ratio parameter
and press the [ENTER] key to normalize.
You can also select the Clip Key directly by pressing a note
on the keyboard.
■ Clip Key
Select the Clip Key of the target Phrase Clip.
❏ Settings: C0 ~ C6
■ Clip Number
Select the target Phrase Clip.
❏ Settings: 1 ~ 256
■ Ratio
Set an amplitude ratio in normalization of a volume
level. With a value of “100” (%), a peak level will
be normalized into full 16 bits, which means there is
virtually no distortion in resulting levels. If the
volume level in an original Clip is extremely low, set
a value less than “100” (%) for a waveform
smoother in level changes. You can set a value more
than “100” (%) for an intentionally distorted sound.
❏ Settings: 0 ~ 200%
Once you perform this operation on a Phrase Clip, its
original data will be overwritten and you will not be
able to undo the changes. Important data should always
be backed up or copied to a separate Phrase Clip
Number before performing this operation.
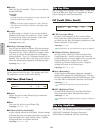
PCLP Normalize) Ratio
Job C 2:001[SmplName] 100%
PCLP LoopRemix) Type Vari
<< Retry? [YES]/[NO] >> 1 A