


57
Basics
Section
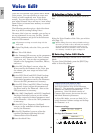
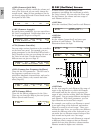
@Check that note C1 is selected, then press the
[ENTER] key. The Variation parameters for
[Clip 001] will be displayed.
To return to the previous screen, press the [EXIT]
key.
#Use Knob [A] to select the Variation number.
We will start with Variation 1.
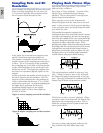
$As explained earlier (Page 54), the Play
parameter specifies how the Phrase Clip is
played back. There are three possible settings
for this parameter, but we will select “reverse”
here. Use Knob [B] to select.
Now press note C1 on the keyboard and check
that the Phrase Clip has indeed been reversed.
Reverse playback involves the sound being played
in reverse from the End point to the Start point.
You can change the length by simply adjusting
these points. When you record a Phrase Clip, the
Start point is initially set at the beginning of the
recording and the End point at the end of the
recording.
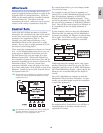
%Press the [EXIT] key to return to the OSC Asgn
(Oscillator Assign) screen. This time, select the
D1 note and press the [ENTER] key.
SHIFT PAGE
PART
ELEMENT
DATAA B C 1 2
PCLPíVar) Play Start Loop End
(C 1) 1: reverse 0 0 236378
SHIFT PAGE
PART
ELEMENT
DATAA B C 1 2
PCLPíVar) Play Start Loop End
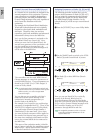
(C 1) 1: loop 0 0 236378
PCLPíVar) Play Start Loop End
(C 1) 1: loop 0 0 236378
DEC NO INC YES
EXIT ENTER
EF
BYPASS
MASTER
KEYBOARD
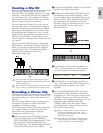
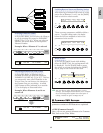
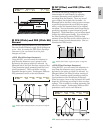
^Next, select Variation 2 but set the Play
parameter to “loop” this time. When you press
note D1 at this point, the Phrase Clip is simply
played back as a loop between the Start and
End points of the recording. If you only want
one part of the Phrase Clip to be played back as
a loop, you need to set the Start/Loop/End
points. As an example, we will set a loop
exactly one bar in length.
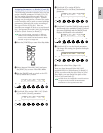
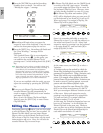
&Use Knob [C] to set the Start point (the point at
which playback will begin when you press a
note). To create a 1-bar looped drum pattern,
you need to press note D1 and adjust the Start
point so that it matches up with the first beat
in the bar.
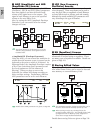
*Use Knob [1] to set the Loop point (the start of
the section to be looped). Since you will be
creating a loop exactly one bar in length, the
Loop point can be set to the same position as
the Start point.
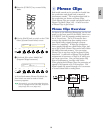
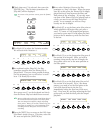
(Use Knob [2] to set the End point (the end of
the section to be looped). For a 1-bar drum
pattern, you need to set the End point at the
end of the fourth beat in the bar (i.e.,
immediately before the first beat of the next
bar). Press note D1 and keep adjusting the End
point until you find the ideal point for looped
playback.
SHIFT PAGE
PART
ELEMENT
DATAA B C 1 2
PCLPíVar) Play Start Loop End
(D 1) 2: loop 119120 119120 452316
SHIFT PAGE
PART
ELEMENT
DATAA B C 1 2
PCLPíVar) Play Start Loop End
(D 1) 2: loop 119120 119120 236378
SHIFT PAGE
PART
ELEMENT
DATAA B C 1 2
PCLPíVar) Play Start Loop End
(D 1) 2: loop 119120 0 236378