


150
Phrase Clip Mode
Variation Settings
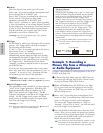
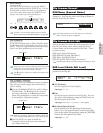
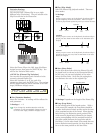
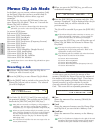
You can play back a Phrase Clip in up to eight
different ways (Variations). They are related to the
Clip Kit as shown in the illustration.
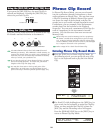
Select the Phrase Clip at the OSC Asgn (Oscillator
Assign) screen, then press the [ENTER] key. You
will see the Variation Edit screen.
• PCLP Var (Phrase Clip Variation)
You can edit the settings of each Variation in the
currently selected Phrase Clip.
Select the Variation (1 to 8), set each of its
parameters, then press the [EXIT] key. The settings
will be applied and you will be returned to the OSC
Asgn (Oscillator Assign) screen.
■ Var (Variation Number)
Select the Variation. Its settings will be reflected in
each parameter.
❏ Settings: 1 ~ 8
If you change the Variation Number with this
parameter, it will automatically change one that is
set in the OSC Asgn (Oscillator Assign) screen.
PCLP Var) Play Start Loop End
(C 3)=1: oneshot 2097150 2097150 2097150
Clip 1~256
Variation 1~8
Clip kit 1~4
Clip1~256
Variation 1 Variation 8Variation 2
■ Play (Play Mode)
Select the Phrase Clip playback method. There are
three modes.
❏ Settings:
loop:
When you press a note on the keyboard, the Phrase Clip is
played completely from its Start Point. Then its looped
section is played back repetitively until you release the note.
oneshot:
When you press a note on the keyboard, the Phrase Clip is
played just once from its Start Point to its End Point (not
looped).
reverse:
When you press a note on the keyboard, the Phrase Clip is
played in reverse, just once, from its End Point to its Start
Point (not looped).
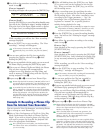
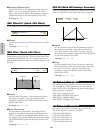
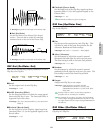
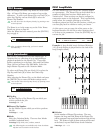
■ Start (Start Point)
Set the Start Point from which the Phrase Clip will
be played back (as shown in the illustration below).
In this case, you can avoid playback of the noise
before the Start Point. Note that this setting does
not eliminate the noise in the original Clip.
❏ Settings: Depends on the length of the Phrase Clip
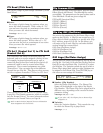
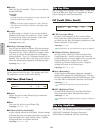
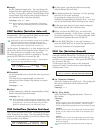
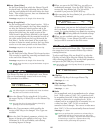
■ Loop (Loop Point)
Set the starting point of the looped section. With a
violin sound, for example, the Loop Point should be
set after the distinctive attack portion and at the start
of the sustained section of the sound. When playing
back this loop, the distinctive attack portion of the
violin sound is played back, followed by the looped
section corresponding with the sustained section of
the violin sound (between the Loop Point and the
End Point.) On the other hand, if the sound does not
have a distinctive attack portion, the Loop Point can
be set to the same position as the Start Point.
Start Point
Record Start
Necessary portion
Noise
End
Point
Data
End
Data Top Start Point
End
Point
Data
End
Data Top Start Point
End
Point
Loop
Point
Looped Section
Data EndData Top Start Point