


154
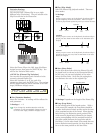
Phrase Clip Mode
Phrase Clip Job Mode
In the Mode, you can execute various operations (jobs)
on the Phrase Clips that you have created/edited in
Phrase Clip Edit Mode, such as delete, copy and
normalize.
You will see the 1st screen (PCLP Status) when you
enter Phrase Clip Job Mode. There are 14 screens for
Phrase Clip Jobs, as follows.
Before you can execute a Phrase Clip Job in Phrase Clip
Job Mode, you need to select the Clip Kit (Page 142).
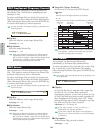
1st screen: PCLP Status
2nd screen: PCLP Rename
3rd screen: PCLP VariationSet
4th screen: PCLP LoopRemix
5th screen: PCLP Normalize
6th screen: PCLP FreqConvert (Frequency Convert)
7th screen: PCLP Extract
8th screen: PCLP Delete
9th screen: PCLP Copy
10th screen: PCLP SampleRcv (Sample Receive)
11th screen: PCLP AutoKeyMap
12th screen: PCLP Kit Key Copy
13th screen: PCLP Kit Key Initialize
14th screen: PCLP Kit Initialize
Details about how to enter Phrase Clip Job Mode are given
on Page 22.
Executing a Job
1In Phrase Clip Play Mode, select the Clip Kit on
which you wish to execute a Job.
2Press the [JOB] key to enter Phrase Clip Job Mode.
3Use the [PAGE] knob to switch to the screen for the
Phrase Clip Job you wish to execute. The selected
Job will be displayed.
4Use Knobs [A], [B], [C], [1] and [2] to enter each of
the parameter settings. (You can also use the [DATA]
knob and the [DEC/NO] and [INC/YES] keys.)
Most Jobs are executed to a Clip Key or Clip assigned to
a Clip Key. You can select a target Clip Key Number
using Knob [A] or a target Clip Number using Knob [B].
When you specify a Phrase Clip by its number, you can
select a Clip not assigned to a key note on the keyboard.
You may assign that Clip to a key note in Phrase Clip
Edit Mode so that you can play it in Phrase Clip Edit
Mode (Page 146).
You will not need to follow the next two steps at the 1st
screen (PCLP Status).
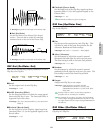
PCLP LoopRemix) Type Vari
JOB C 2:001[SmplName] 1 A
5When you press the [ENTER] key, you will see a
confirmation message.
6Press the [INC/YES] key to execute each Job. The
message “Completed.” will be displayed after the job
has executed, and you will be returned to the
previous screen.
The Job will be canceled if you press the [DEC/NO]
key.
If the Phrase Clip Job takes some time to execute, you
will see the message “Executing...” If you switch the
power off in this state, the data may be damaged.
7If you press the [EXIT] key, you will be taken out of
Phrase Clip Job Mode and returned to Phrase Clip
Play Mode.
The steps in each procedure may vary slightly,
depending on the Job being performed. Refer to the
explanation of each Job for details.
The following Jobs are available only when the Phrase
Clip has been recorded in 16-bit format.
3rd screen: PCLP VariationSet
4th screen: PCLP LoopRemix
5th screen: PCLP Normalize
6th screen: PCLP FreqConvert (Frequency Convert)
7th screen: PCLP Extract
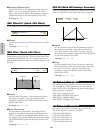
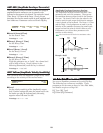
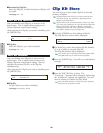
PCLP Status
At this screen, you can check the amount of free
memory (DRAM) for Phrase Clips and the amount of
free memory left on the Memory Card. These factors
govern the size/number of Phrase Clips that can be
opened/recorded, as well as whether or not the
currently selected Clip Kit can be saved to Memory
Card. This screen has no adjustable parameters.
■ Free
Shows the amount of free memory (DRAM) for
Phrase Clips.
■ Used
Shows the amount of memory used by Phrase Clips
and Clip Kits if you store them in Memory Card.
■ CardFree
Shows the amount of free memory on the Memory
Card.
If the [-x›] indicator is displayed to the right of the Used
parameter, this means that the amount of used memory
exceeds the free space available on the Memory Card.
PCLP Status) Free Used CardFree
1.1MB 2.9MB(70%)- 1.8MB
PCLP LoopRemix) Type Vari
<< Are You Sure [YES]/[NO] >>