


179
Appendix
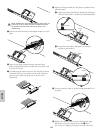
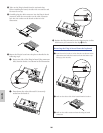
Removing the Plug-in board from the keyboard
1 Remove the cable from the hook-shaped bundle tie.
2 Press down the hooks 2 in the direction as shown in the
illustration and take the board out from the hooks 2 by
lifting up the one side.
3 Pull out the other side of the board from the hooks 1.
4 Pull out the cable connector from the Plug-in board
connector.
5 Fix the connector cable to the hook-shaped bundle tie.
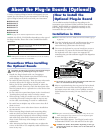
Installation in CS6R
n For information on how to handle the CS6x, go to page 177.
1 Turn the keyboard power off, and disconnect the power
cord. Also, if the keyboard is connected with other
external device(s), disconnect the device(s).
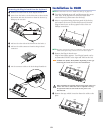
2 Move to a position facing the front panel of the device,
and remove the screws (six flat-head screws) from the
Plug-in board cover at the top panel with a coin or a
Phillips screwdriver.
n Keep the removed (6) screws in a safe place. They will be used
when attaching the Plug-in board cover to the device again.
3 Remove the Plug-in board cover.
Plug-in board plate appears. Two Plug-in boards can be
accommodated: PLG1 at the right and PLG2 at the left.
Available slot (PLG1, PLG2) differs depending on the type
of the Plug-in boards. See 177 for more information.
When installing the optional Plug-in board (from when you
remove the cover to when the cover is replaced securely)
all operations must be done with the AC power cord
disconnected.
4 Remove the tape which is used to fasten the cable to the
plate.
tape
PLG2PLG1
PLG2
PLG1
PLG2PLG1