


68
Basics
Section
9Turn the [PAGE] knob and open the ARP Type
(Arpeggio Type) screen. Set “on” for “Switch.”
In steps 6 to 9, you now complete settings for
the lower range for Arpeggiator performance.
It will play in a Voice assigned to Part 1 based
on MIDI Receive channel 1.
Refer to Page 82 for detailed settings of
Arpeggiator.
You can copy (reuse) the arpeggio settings that belong
to the Voice assigned to Part 1 (Page 141).
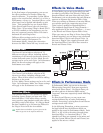
)In the same manner, use Knob [A] to select
Part02. Then select the solo instrument Voice at
the MIX Vce screen and set the RcvCh (MIDI
receive channel) parameter in the LYR Mode
screen to “2.” Now, the solo Voice for Part 2 will
sound when playing notes at and above the Split
point, or when receiving through MIDI channel 2.
The RcvCh parameter setting will be ignored if
you set the Layer parameter in the LYR Mode
screen to “on.”
For Parts that you are not using, set their RcvCh
parameters to something other than 1 or 2.
Further settings are available in Performance Edit
Mode. If a Part does not sound, check the volume
level and other settings for that Part. Details are
given on Page 130.
!Before exiting Performance Edit Mode, store
above settings in a Performance. For storing a
Performance, refer to Page 141.
In Performance Play Mode, recall the Performance
you have just stored. Simply pressing the
[MASTER KEYBOARD] key activates or
deactivates the Split configuration you made above.
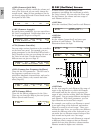
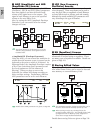
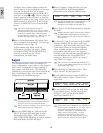
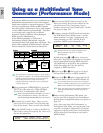
4 Zones
The illustration below shows an example of a 4-zone
configuration. A zone refers to a specific key range on
the keyboard. You can logically divide a keyboard into
up to four key ranges with separate MIDI channels
and other associated settings so that you can control
multiple Parts at the same time. A Split setting can
divides the entire keyboard into two absolute sections
(key ranges). In a 4-zone setting, however, each
section can overlap to one another. You can even set a
section to cover or include other sections.
The following example is to set Zone 1 for playing a
rhythm loop created previously in Phrase Clip Mode
(page 55), Zone 2 for performance by Arpeggiator,
Zone 3 for manual solo performance, and Zone 4 for
playing an external MIDI tone generator. Also in this
settings, Zones 3 and 4 overlap in the same range, and
entire performance in four all zones is output from the
MIDI OUT connector so that you can record that
performance on an external MIDI sequencer. You can
make this configuration in the following steps.
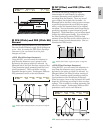
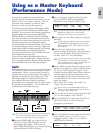
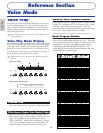
ARPíType) Type Tempo Switch Hold
Part01 UpOct1:Sq 120 on off
Before you set up a 4-zone configuration in the
following procedure, edit and prepare necessary
Voices (for Arpeggiator and manual play) and
Phrase Clip Kit in their associated Edit Modes.
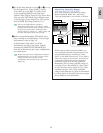
1Press the [PERFORM] key, followed by the
[EDIT] key (each LED will light) to enter
Performance Edit Mode. Then, press the
[MASTER KEYBOARD] key to activate Master
Keyboard Mode (the LED will light).
2Select “Common” using the Knob [A], then
open the GEN M. Kbd (General Master
Keyboard) screen using the [PAGE] knob.
Turning the [PAGE] knob while holding down the
[SHIFT] key enables you to scroll though
parameters in the Menu screens (Page 121).
3Select “4zone” for the Mode parameter using
the Knob [B].
If Master Keyboard Mode is deactivated (without
the [MASTER KEYBOARD] key pressed), the
Mode parameter value will be shown in brackets
(like “(4zone)”).
4Select one of “Zone01” to “Zone04” using the
Knob [A]. As we have selected “4zone” for the
Mode parameter, you can now select setting
screens for four Zones. Select “Zone01” to get
started with the settings.
You can also use the BANK [A] to [D] keys to
respectively select “Zone01” to “Zone04.”
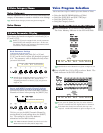
MKBíTransmit) TrnsCh TG MIDI
Zone01 Ch01 on on
GENíM.Kbd) Mode Lower Upper Point
Common split ch01 ch02 C 3