


55
Basics
Section
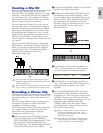
Creating a Clip Kit
You can assign Phrase Clips to notes on the
keyboard (C0 to C6) and play them live or using a
sequencer. You can also edit various parameters
for each Phrase Clip. The assignment of Phrase
Clips across the keyboard is known as a Clip Kit,
and you can create up to four of these.
You can assign each Phrase Clip to one note on
the keyboard. However, by assigning breakbeats
and other rhythmic loops plus percussive Phrase
Clips used in the rhythms, you can create a Clip
Kit specifically for rhythms only. Or you could
assign Phrase Clips of unusual sounds to create a
Clip Kit of special effects. Essentially, you can
create a Clip Kit consisting of any sounds that suit
your needs.
Clip Kits can be treated the same as Voices and
Performances. For instance, in Phrase Clip Play
Mode, you can play Clip Kits directly using the
keyboard (Page 142). In Performance Mode, a
Clip Kit can be included as a Part in a
Performance (Page 129).
You can further edit Clip Kits and Phrase Clips in
Edit Mode (Page 146) and perform jobs on them in
Job Mode (Page 154).
When you switch off your synthesizer, the Clip Kit will
be lost. Always save important data to Memory Card.
Recording a Phrase Clip
This section explains how to record a Phrase Clip,
set the loop and so on, execute jobs, and create a
Clip Kit.
You can create a Phrase Clip by recording from a
microphone, CD player or some other audio
equipment, or from an existing
Voice/Performance/Phrase Clip in the synthesizer.
As a simple example, we will record the drum
pattern that was created earlier using the
Arpeggiator and Drum Voice.
1Before entering Phrase Clip Mode, first enter
Voice Play Mode and press the MEMORY
[PRE1] and [PRE2] keys simultaneously. Then
use the [DATA] knob, the [DEC/NO] and
[INC/YES] keys or the PROGRAM keys (CS6x)
to select the Preset Drum Voices (DR1).
2Now press the PHRASE CLIP key (its LED will
light) to enter Phrase Clip Mode.
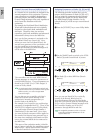
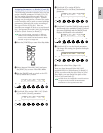
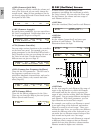
3Hold down the PHRASE CLIP [REC] key and
the following screen will be displayed. Here,
you can assign a key to the Phrase Clip you are
about to record. While still holding down the
key simply press the respective key on the
keyboard. Here, we will assign note C1. Now
release the [REC] key to switch to the
Recording screen.
4Use Knob [B] to set the Source parameter to
“voice” The Drum Voice you selected earlier
can now be played on using the keyboard.
5Use Knob [C] to set the Trigger parameter to
“key.” With this setting, the recording process
will begin when you press a note on the
keyboard.
6Press the ARPEGGIO [ON/OFF] key on the
front panel (its LED will light) to switch the
Arpeggiator on. When you press a note on the
keyboard, a drum pattern will now play back
according to the Arpeggiator settings. You can
adjust the tempo using the SEQ PLAY
[TEMPO] knob on the front panel. Before
proceeding further, make sure that you have
selected the correct sound.
With the CS6R, select the Drum Voice, enter
Drum Voice Edit Mode (Page 102), set it’s
Arpeggio Switch parameter to “on,” and then
enter Phrase Clip Mode.
To prevent the deterioration in sound quality
when recording, you should set a high output
level for the Voice (in Voice Edit Mode).
PCLP Rec) Source Trigger [ENTER]
(Key=C 1) voice key toStandby
PHRASE CLIP
PITCH
REC
PCLP Rec) >> Select Record Key <<
>> C 1:off[ ] <<