


45
Basics
Section
2Use the Sound Control knobs and Assignable
Knobs [1]/[2] to get the sound that you will
store as a Scene.
Each Voice can have its own settings for
Assignable Knobs [1]/[2] (Pages 51, 84).
3If you wish, you can set up a different Scene
for the other SCENE key.
4Store the Voice (Page 116) or Performance
(Page 141); its Scene settings will be stored
with it.
If you store the Voice or Performance while the
LEDs of both SCENE keys are lit (i.e., after
adjusting the SCENE [CONTROL] knob), this
state will also be stored with the Voice or
Performance.
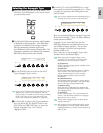
Storing Scenes
If you use the Sound Control knobs or Assignable
Knob [1]/[2] to change the sound settings while the
LEDs for both SCENE keys are lit (i.e., a mixture
of settings from both Scenes is being used), these
new settings should be stored to either SCENE key
as a new Scene. This operation is known as Scene
Store, and is explained as follows.
1Press the SCENE [1] or SCENE [2] key while
holding down the STORE key. The LED for
the key you select will light and the positions of
the knobs will be stored.
As explained earlier, if you edit the sound while
either SCENE key LED is lit, this means that you
are editing the Scene directly so you do not need to
perform a Scene Store.
2Store another Scene to the other SCENE key if
necessary.
3Store the Voice (Page 116) or Performance
(Page 141) to save the Scene settings.
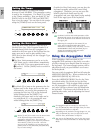
Recalling Scenes
You can easily recall a Scene by pressing the
SCENE [1] key or SCENE [2] key. The SCENE
key’s LED will light.
When you switch between Voices or Performances,
one of the Scenes will always be selected (the
SCENE [1] key or SCENE [2] key LED will be lit).
It is also possible that the LED for both SCENE keys
will be lit, meaning that the sound uses a mixture of
both Scenes.
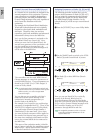
When you recall a Scene, the knob position settings
for that Scene will be recalled, regardless of the
current physical positions of the knobs.
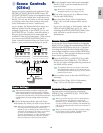
2 Scene Controls
(CS6x)
Scenes are used to memorize the positions of the
FILTER [CUTOFF]/[RESONANCE] knobs, EG
[ATTACK]/[DECAY] knobs and Assignable Knobs
[1]/[2], and can be recalled later at the touch of a
button. You can use the knobs to edit the sounds
in real time, then store their positions with each
Voice/Performance as Scene 1 and Scene 2.
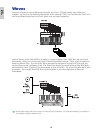
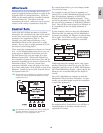
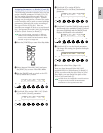
As an example, the illustration below shows two
different groups of knob settings (A and B)
assigned, respectively, to the SCENE [1] key and
the SCENE [2] key. In effect, what this means is
that two types of sound can be memorized and
recalled for each Voice/Performance. What’s more,
you can use the SCENE [CONTROL] knob to
create a smooth transition from one Scene to the
other, or even a mix between Settings A and B.
Scene Settings
When stored, the Scenes are held in a temporary edit
buffer and the settings are lost if you switch to another
Voice or Performance, or if you change Mode. Therefore,
once you have stored the Scene, you should store the Voice
or Performance; the Scene settings will be stored along
with it.
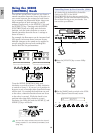
1In Voice/Performance Mode, select the Voice/
Performance for which you wish to store Scenes.
When you switch between Voices or Performances,
one of the Scenes will always be selected (the
SCENE [1] key or SCENE [2] key LED will be lit).
Therefore, the settings for the Scene you are about
to switch to will be different to those of the
currently selected Scene. It is also possible that the
LEDs for both SCENE keys will be lit, meaning
that the sound uses a mixture of both Scenes.
1 2
CONTROL
SCENE
A B C 1 2
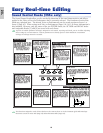
VCE Play) PRE1:128(H16)[Pf:GrandPiano]
EQ Low EQ Mid EQ Hi Cutoff RevTime
A B C 1 2
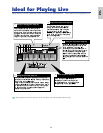
VCE Play) PRE1:128(H16)[Pf:GrandPiano]
EQ Low EQ Mid EQ Hi Cutoff RevTime