


Flush Mounting the GPSMAP 172/172C External Antenna Unit
The GPSMAP 172/172C External Antenna only can be flush mounted on a flat panel. When flush
mounting the GPSMAP 172/172C, be sure to choose an appropriately sized location for the unit. Check
that all cables reach the unit mounting location before beginning installation. Use the Flush Mount
Template provided in the box to determine a location. Always wear safety goggles, ear protection, and a
dust mask when drilling, cutting or sanding.
To flush mount the GPSMAP 172/172C (External Antenna ONLY):
Included Mounting Hardware — 4 - 3mm Studs, 4 - Flat Washers, 8 - 3mm Hex Nuts.
Tools (not included) — Center Punch, Drill, 1/8” (3mm) Drill Bit, 3/8” (6mm) Drill Bit, Jig Saw, 1/16”
(2mm) Allen Wrench, 9/35” (7mm) Wrench.
1. Trim the Flush Mount Template and tape in the desired location.
2. Using a Center Punch, indent the center of each Mounting Hole location.
3. Using a 1/8” (3mm) drill bit, drill the four Mounting Holes.
4. Using a 3/8” (6mm) drill bit, drill a hole for a location to begin cutting the mounting surface.
5. Using the Jig Saw, cut the mounting surface along the inside of the dashed line indicated on the
template. Be very careful when cutting this hole, there is only a small amount of clear
-
ance between the unit and the Mounting Holes. It may be prudent to cut slightly inside the
indicated line and then sand or file the panel as needed to obtain the best fit.
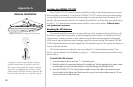
6. Install the four Mounting Studs into the unit by screwing the shorter section into the back of the
unit. Use a 1/16” (2mm) Allen Wrench to tighten the Mounting Studs until the stops contact the
case. Be careful not to overtighten as this may damage the Mounting Stud. The studs have a reus
-
able thread-locking patch pre-applied from the factory.
7. Place the unit in position inside the cutout area of the mounting surface.
8. Place washers over the Mounting Studs, then thread on one Hex Nut per Mounting Stud. Tighten
all four Hex Nuts until the unit is snug against the mounting surface. Install and tighten the second
Hex Nut on all four Mounting Studs to lock the first Hex Nut in place.
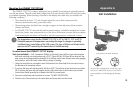
Studs
Washer
Hex Nuts
91
Appendix G
Unit Installation