


situation should be avoided by using boat-heading data from an
electronic compass.
If the boat heading is based on data from a magnetic heading
sensor or an automatic pilot, the heading data could be
compromised due to incorrect setup, mechanical malfunction,
magnetic interference, or other factors. If the heading data is
compromised, the Radar overlay may not align perfectly with the
chart data.
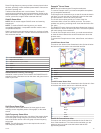
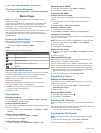
Showing the Radar Overlay
The radar overlay displays data based on the most recently
used radar mode.
Select Charts > Radar Overlay.
The radar picture appears in orange and overlays the
navigation chart.
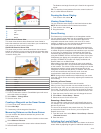
Setting a Custom Park Position
If you have more than one radar on your boat, you must be
viewing the radar screen for the radar you want to adjust.
By default, the antenna is stopped perpendicular to the pedestal
when it is not spinning. You can adjust this position.
1
From the radar screen, select Menu > Radar Setup >
Antenna Configuration > Park Position.
2
Use the slider bar to adjust the position of the antenna when
stopped, and select Back.
Enabling and Adjusting a Radar No Transmit
Zone
You can indicate an area within which the radar scanner does
not transmit signals.
NOTE: This feature is not available on all radar and chartplotter
models.
1
From a radar screen, select Menu > Radar Setup > Enable
No Transmit Zone.
The no-transmit zone is indicated by a shaded area on the
radar screen.
2
Select Adjust No Transmit Zone > Move No Transmit
Zone.
3
Select Angle 1, and select the new location for the first
angle.
4
Select Angle 2, and select the new location for the second
angle.
5
Select Done.
Stopping the Transmission of Radar Signals
From a radar screen, select Menu > Radar To Standby.
TIP: Press from any screen to quickly stop radar
transmission.
Optimizing the Radar Display
You can adjust the radar display settings for reduced clutter and
increased accuracy.
NOTE: You can optimize the radar display for each radar mode.
1
Select a radar range (Adjusting the Radar Range, page 21).
2
Restore the default value of the gain setting (Adjusting Gain
on the Radar Screen Automatically, page 23).
3
Adjust the gain setting manually (Adjusting Gain on the
Radar Screen Manually, page 23).
Radar Gain and Clutter
Adjusting Gain on the Radar Screen Automatically
The automatic gain setting for each radar mode is optimized for
that mode, and may differ from the automatic gain setting used
for another mode.
NOTE: Depending upon the radar in use, the gain setting
configured for use in one radar mode may or may not be applied
to other radar modes or to the Radar overlay.
NOTE: Not all options and settings are available on all radar and
chartplotter models.
1
From a radar screen or the radar overlay, select Menu >
Gain.
2
Select an applicable option for the connected radar:
• To set the gain automatically once, based on average
conditions, the range of the radar signal, and the selected
radar mode, select Auto.
The chartplotter does not adjust the gain automatically in
response to changing conditions.
• To adjust the gain automatically for changing conditions,
select Auto Low or Auto High.
• To adjust the gain automatically to show birds over the
surface of the water, select Auto Bird.
Adjusting Gain on the Radar Screen Manually
For optimal radar performance, you can manually adjust the
gain.
NOTE: Depending upon the radar in use, the gain setting
configured for use in one radar mode may or may not be applied
to other radar modes or to the Radar overlay.
1
From a Radar screen or the Radar overlay, select Menu >
Gain.
2
Select Up to raise the gain, until light speckles appear across
the Radar screen.
Data on the Radar screen is refreshed every few seconds. As
a result, the effects of manually adjusting the gain may not
appear instantly. Adjust the gain slowly.
3
Select Down to lower the gain until the speckles disappear.
4
If boats, land, or other targets are within range, select Down
to lower the gain until the targets begin to blink.
5
Select Up to raise the gain until the boats, land, or other
targets appear steadily lit on the Radar screen.
6
Minimize the appearance of nearby large objects, if
necessary.
7
Minimize the appearance of side-lobe echoes, if necessary.
Minimizing Nearby Large-Object Interference
Nearby targets of significant size, such as jetty walls, can cause
a very bright image of the target to appear on the Radar screen.
This image can obscure smaller targets located near it.
NOTE: Depending upon the radar in use, the gain setting
configured for use in one radar mode may or may not be applied
to other radar modes or to the Radar overlay.
1
From a Radar screen or the Radar overlay, select Menu >
Gain.
2
Select Down to lower the gain until the smaller targets are
clearly visible on the Radar screen.
Reducing the gain to eliminate nearby large-object
interference may cause smaller or distant targets to blink or
disappear from the Radar screen.
Minimizing Side-Lobe Interference on the Radar Screen
Side-lobe interference may appear to streak outward from a
target in a semi-circular pattern. Side-lobe effects can be
avoided by reducing the gain or reducing the radar range.
NOTE: Depending upon the radar in use, the gain setting
configured for use in one radar mode may or may not be applied
to other radar modes or to the Radar overlay.
1
From a Radar screen or the Radar overlay, select Menu >
Gain.
2
Select Down to lower the gain until the semi-circular,
streaked pattern disappears from the Radar screen.
Radar 23