


Sail Racing
You can use the device to increase the likelihood that your boat
will cross the start line of a race exactly when the race begins.
When you synchronize the race timer with the official race
countdown timer, you are alerted at one-minute intervals as the
race start approaches. When you combine the race timer with
the virtual start line, the device measures your speed, bearing,
and remaining time on the countdown timer. The device uses
this data to indicate whether your boat will cross the start line
before, after, or at the correct time to start the race.
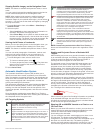
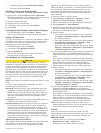
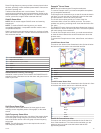
Starting Line Guidance
Sailing start line guidance is a visual representation of the
information you need to cross the start line at the optimal time
and speed.
After you set the starboard and port start line pins, and the
target speed and time, and after you start the race timer, a
predictor line appears. The predictor line extends from your
current location toward the start line and the laylines that extend
from each pin.
The end point and color of the predictor line indicate where the
boat will be when the timer expires, based on your current boat
speed.
When the end point is before the start line, the line is white. This
indicates the boat must increase speed to reach the start line on
time.
When the end point is past the start line, the line is red. This
indicates the boat must reduce speed to avoid a penalty for
reaching the start line before the timer expires.
When the end point is on the start line, the line is white. This
indicates the boat is moving at an optimal speed to reach the
start line when the timer expires.
By default, the start line guidance window and the race timer
window appear in the Sail Racing combination screen.
Setting the Starting Line
The start line guidance window is added to the Sail Racing
combination screen by default.
1
From the Sail Racing combination screen, select Menu >
Start Line Guidance > Start Line.
2
Select an option:
• To mark the port and starboard starting line marks as you
sail past them, select Ping Marks.
• To mark the port and starboard starting line marks by
entering their coordinates, select Enter Coordinates.
• To switch the position of the port and starboard marks
after you have set them, select Swap Port & Starbd.
Marks.
Using the Starting Line Guidance
You can use the starting line guidance feature to help get you
cross the start line, at the optimal speed during a sailing race.
1
Mark the starting line (Setting the Starting Line, page 13).
2
From the Sail Racing combination screen, select Menu >
Start Line Guidance > Target Speed, and select your target
speed when crossing the starting line.
3
Select Target Time, and select the target time to cross the
starting line.
4
Select Back.
5
Start the racing timer (Starting the Race Timer, page 13).
Starting the Race Timer
The race timer is added to the Sail Racing combination screen
by default.
1
From the Sail Racing combination screen, select Start.
NOTE: You can also access this from the Sailing SmartMode
screen and the navigation chart.
2
When necessary, select Sync to synchronize with the official
race timer.
Stopping the Race Timer
From the Sail Racing combination screen, select Stop.
Setting the Distance between the Bow and the GPS
Antenna
You can enter the distance between the bow of your boat and
the location of your GPS antenna. This helps ensure the bow of
your boat crosses the starting line at the precise start time.
1
From a navigation chart, select Sailing > Start Line > GPS
Bow Offset.
2
Enter the distance.
3
Select Done.
Laylines Settings
When in sailing mode (Setting the Vessel Type, page 2), you
can display laylines on the navigation chart. Laylines can be
very helpful when racing.
From the navigation chart, select Menu > Sailing > Laylines.
Display: Sets how the laylines and vessel are shown on the
chart, and sets the length of the laylines.
Sailing Ang.: Allows you to select how the device calculates
laylines. The Actual option calculates the laylines using the
measured wind angle from the wind sensor. The Manual
option calculates the laylines using manually entered
windward and leeward angles.
Tide Correction: Corrects the laylines based on the tide.
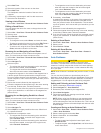
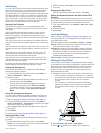
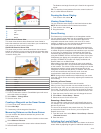
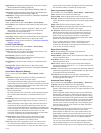
Setting the Keel Offset
You can enter a keel offset to compensate the surface reading
for the depth of a keel, making it possible to measure depth from
the bottom of the keel instead of from the transducer location.
Enter a positive number to offset for a keel. You can enter a
negative number to compensate for a large vessel that may
draw several feet of water.
1
Complete an action, based on the location of the transducer:
• If the transducer is installed at the water line
À
, measure
the distance from the transducer location to the keel of the
boat. Enter this value in steps 3 and 4 as a positive
number.
• If the transducer is installed at the bottom of the keel
Á
,
measure the distance from the transducer to the water
line. Enter this value in steps 3 and 4 as a negative
number.
2
Select Settings > My Vessel > Keel Offset.
3
Select or based on the location of the transducer.
Sailing Features 13