


1
From a chart or a 3D chart view, select Menu > Other
Vessels > Display Setup.
2
Select an option:
• To indicate the distance from your location in which AIS
vessels appear, select Display Range, and select a
distance.
• To show MARPA-tagged vessels, select MARPA > Show.
• To show details about AIS-activated and MARPA-tagged
vessels, select Details > Show.
• To set the projected heading time for AIS-activated and
MARPA-tagged vessels, select Proj. Heading, and enter
the time.
• To show the tracks of AIS vessels, select the length of the
track that appears using a trail, select Trails, and select
the length.
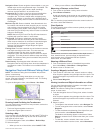
Activating a Target for an AIS Vessel
1
From a chart or a 3D chart view, select an AIS vessel.
2
Select AIS Vessel > Activate Target.
Viewing Information about a Targeted AIS Vessel
You can view the AIS signal status, MMSI, GPS speed, GPS
heading, and other information that is reported about a targeted
AIS vessel.
1
From a chart or a 3D chart view, select an AIS vessel.
2
Select AIS Vessel.
Deactivating a Target for an AIS Vessel
1
From a chart or a 3D chart view, select an AIS vessel.
2
Select AIS Vessel > Deactivate.
Viewing a List of AIS and MARPA Threats
1
From a chart or a 3D chart view, select Menu > Other
Vessels > List > Show.
2
Select the type of threats to include in the list.
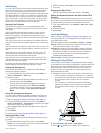
Setting the Safe-Zone Collision Alarm
Before you can set a collision alarm, you must have a
compatible chartplotter connected to an AIS device or radar.
The safe-zone collision alarm is used only with AIS and MARPA.
MARPA functionality works with radar. The safe zone is used for
collision avoidance and can be customized.
1
Select Settings > Alarms > AIS > Collision Alarm > On.
A message banner appears and an alarm sounds when a
MARPA-tagged object or an AIS-activated vessel enters the
safe-zone area around your boat. The object is also labeled
as dangerous on the screen. When the alarm is off, the
message banner and audible alarm are disabled, but the
object is still labeled as dangerous on the screen.
2
Select Range.
3
Select a distance for the safe-zone radius around your
vessel.
4
Select Time To.
5
Select a time at which the alarm will sound if a target is
determined to intersect the safe zone.
For example, to be notified of a pending intersection 10
minutes before it will likely occur, set Time To to 10, and the
alarm will sound 10 minutes before the vessel intersects the
safe zone.
AIS Distress Signals
Self-contained AIS distress signal devices transmit emergency
position reports when activated. The chartplotter can receive
signals from Search and Rescue Transmitters (SART),
Emergency Position Indicating Radio Beacons (EPIRB), and
other man overboard signals. Distress signal transmissions are
different than standard AIS transmissions, so they appear
differently on the chartplotter. Instead of tracking a distress
signal transmission for collision avoidance, you track a distress
signal transmission to locate and assist a vessel or person.
Navigating to a Distress Signal Transmission
When you receive a distress signal transmission, a distress
signal alarm appears.
Select Review > Go To to begin navigation to the
transmission.
AIS Distress Signal Device Targeting Symbols
Symbol Description
AIS distress signal device transmission. Select to see more
information about the transmission and begin navigation.
Transmission lost.
Transmission test. Appears when a vessel initiates a test of
their distress signal device, and does not represent a true
emergency.
Transmission test lost.
Enabling AIS Transmission Test Alerts
To avoid a large number of test alerts and symbols in crowded
areas such as marinas, you can select to receive or ignore AIS
test messages. To test an AIS emergency device, you must
enable the chartplotter to receive test alerts.
1
Select Settings > Alarms > AIS.
2
Select an option:
• To receive or ignore Emergency Position Indicating Radio
Beacon (EPRIB) test signals, select AIS-EPIRB Test.
• To receive or ignore Man Overboard (MOB) test signals,
select AIS-MOB Test.
• To receive or ignore Search and Rescue Transponder
(SART) test signals, select AIS-SART Test.
Turning Off AIS Reception
AIS signal reception is turned on by default.
Select Settings > Other Vessels > AIS > Off.
All AIS functionality on all charts and 3D chart views is
disabled. This includes AIS vessel targeting and tracking,
collision alarms that result from AIS vessel targeting and
tracking, and the display of information about AIS vessels.
Chart and 3D Chart View Settings
NOTE: Not all settings apply to all charts and 3D chart views.
Some options require premium maps or connected accessories,
such as radar.
These settings apply to the charts and 3D chart views, except
the radar overlay and Fish Eye 3D (Fish Eye 3D Settings,
page 7).
From a chart or a 3D chart view, select Menu.
Waypoints and Tracks: See Waypoints and Tracks Settings on
the Charts and Chart Views, page 7.
Other Vessels: See Other Vessels Settings on the Charts and
Chart Views, page 7.
Surface Radar: Shows surface radar details on the Perspective
3D or Mariner's Eye 3D chart views.
Weather Radar: Shows weather radar imaging on the
Perspective 3D or Mariner's Eye 3D chart views.
Navaids: Shows navigational aids on the Fishing chart.
Laylines: Adjusts the laylines, when in sailing mode (Laylines
Settings, page 7).
Chart Setup: See Navigation and Fishing Chart Setup,
page 7.
Chart Appearance: See Chart Appearance Settings, page 7.
This might appear in the Chart Setup menu.
6 Charts and 3D Chart Views