


• To delete the path, select Cancel Auto Guidance.
• To save the path, select Done.
Adjusting a Saved Auto Guidance Path
1
Select Info > User Data > Routes & Auto Guidance Paths.
2
Select a path, and select Review > Edit > Adjust Path.
TIP: When navigating an Auto Guidance path, select the path
on the navigation chart, and select Adjust Path.
3
Select a location on the path.
4
Drag the point to a new location.
5
If necessary, select a point, and select Remove.
6
Select Done.
Canceling an Auto Guidance Calculation in Progress
From the Navigation chart, select Menu > Cancel.
TIP: You can select Back to quickly cancel the calculation.
Setting a Timed Arrival
You can use this feature on a route or an Auto Guidance path to
get feedback about when you should arrive at a selected point.
This allows you to time your arrival at a location, such as a
bridge opening or a race starting line.
1
From the Navigation chart, select Menu.
2
If necessary, select Navigation Options.
3
Select Timed Arrival.
TIP: You can quickly open the Timed Arrival menu by
selecting a point on the path or route.
Auto Guidance Line Configurations
CAUTION
The Safe Depth and Safe Height settings influence how the
chartplotter calculates an Auto Guidance line. If an area has an
unknown water depth or an unknown obstacle height, the Auto
Guidance line is not calculated in that area. If an area at the
beginning or the end of an Auto Guidance line is shallower than
the safe water depth or lower than the safe obstacle height, the
Auto Guidance line is not calculated in that area. On the chart,
the course through those areas appears as a gray line. When
your boat enters one of those areas, a warning message
appears.
NOTE: Auto Guidance is available with premium charts, in some
areas.
You can set the parameters the chartplotter uses when
calculating an Auto Guidance line.
Safe Depth: Sets the minimum depth (chart depth datum) the
chartplotter uses when calculating an Auto Guidance line.
NOTE: The minimum safe depth for the premium charts is 3
feet. If you enter a Safe Depth value of less than 3 feet, the
charts only use depths of 3 feet for Auto Guidance route
calculations.
Safe Height: Sets the minimum height (chart height datum) of a
bridge that your boat can safely travel under.
Shoreline Distance: Sets how close to the shore you want the
Auto Guidance line to be placed. The Auto Guidance line
may move if you change this setting while navigating. The
available values for this setting are relative, not absolute. To
ensure that the Auto Guidance line is placed the appropriate
distance from shore, you can assess the placement of the
Auto Guidance line using one or more familiar destinations
that require navigation through a narrow waterway (Adjusting
the Distance from Shore, page 11).
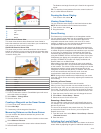
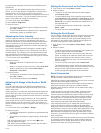
Adjusting the Distance from Shore
The Shoreline Distance setting indicates how close to the shore
you want the Auto Guidance line to be placed. The Auto
Guidance line may move if you change this setting while
navigating. The available values for the Shoreline Distance
setting are relative, not absolute. To ensure the Auto Guidance
line is placed the appropriate distance from shore, you can
assess the placement of the Auto Guidance line using one or
more familiar destinations that require navigation through a
narrow waterway.
1
Dock your vessel or drop the anchor.
2
Select Settings > Preferences > Navigation > Auto
Guidance > Shoreline Distance > Normal.
3
Select a destination that you have navigated to previously.
4
Select Navigate To > Auto Guidance.
5
Review the placement of the Auto Guidance line, and
determine whether the line safely avoids known obstacles
and the turns enable efficient travel.
6
Select an option:
• If the placement of the Auto Guidance line is satisfactory,
select Menu > Navigation Options > Stop Navigation,
and proceed to step 10.
• If the Auto Guidance line is too close to known obstacles,
select Settings > Preferences > Navigation > Auto
Guidance > Shoreline Distance > Far.
• If the turns in the Auto Guidance line are too wide, select
Settings > Preferences > Navigation > Auto Guidance
> Shoreline Distance > Near.
7
If you selected Near or Far in step 6, review the placement of
the Auto Guidance line, and determine whether the line
safely avoids known obstacles and the turns enable efficient
travel.
Auto Guidance maintains a wide clearance from obstacles in
open water, even if you set the Shoreline Distance setting to
Near or Nearest. As a result, the chartplotter may not
reposition the Auto Guidance line, unless the destination
selected requires navigation through a narrow waterway.
8
Select an option:
• If the placement of the Auto Guidance line is satisfactory,
select Menu > Navigation Options > Stop Navigation,
and proceed to step 10.
• If the Auto Guidance line is too close to known obstacles,
select Settings > Preferences > Navigation > Auto
Guidance > Shoreline Distance > Farthest.
• If the turns in the Auto Guidance line are too wide, select
Settings > Preferences > Navigation > Auto Guidance
> Shoreline Distance > Nearest.
9
If you selected Nearest or Farthest in step 8, review the
placement of the Auto Guidance line, and determine
whether the line safely avoids known obstacles and the turns
enable efficient travel.
Auto Guidance maintains a wide clearance from obstacles in
open water, even if you set the Shoreline Distance setting to
Near or Nearest. As a result, the chartplotter may not
reposition the Auto Guidance line, unless the destination
selected requires navigation through a narrow waterway.
10
Repeat steps 3 through 9 at least once more, using a
different destination each time, until you are familiar with the
functionality of the Shoreline Distance setting.
Tracks
A track is a recording of the path of your boat. The track
currently being recorded is called the active track, and it can be
saved. You can show tracks in each chart or 3D chart view.
Showing Tracks
From any chart or a 3D chart view, select Menu >
Waypoints and Tracks > Tracks > On.
A trailing line on the chart indicates your track.
Navigation with a Chartplotter 11