


Viewing two frequencies concurrently using the split-frequency
view allows you to see deeper with the lower frequency return
and, at the same time, see more detail from the higher
frequency return.
Selecting Frequencies
NOTE: You cannot adjust the frequency for all sonar views and
transducers.
You can indicate which frequencies appear on the sonar screen.
1
From a sonar view, select Menu > Frequency.
2
Select a frequency suited to your needs and water depth.
For more information on frequencies, see Sonar
Frequencies, page 17.
Creating a Frequency Preset
NOTE: Not available with all transducers.
You can create a preset to save a specific sonar frequency,
which allows you to change frequencies quickly.
1
From a sonar view, select Menu > Frequency.
2
Select Manage Frequencies > New Preset.
3
Enter a frequency.
Customizing the Panoptix Sonar Views
NOTE: Not all models support Panoptix transducers.
Adjusting the Appearance of the LiveVü Sonar Views
1
From a LiveVü sonar view, select Menu > Sonar Setup.
2
Select an option:
• To change the colors of the sonar view, select Color
Scheme, and select an option.
• To adjust the length of the trails that show target
movement, select Trails, and select an option.
• To distinguish the bottom from the water by coloring the
bottom brown, select Bottom Fill.
• To show or hide the range grid lines, select Grid Overlay.
• To hide or show the history on the side of the screen,
select Scroll History.
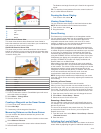
Setting the LiveVü Transducer Transmit Angle
You can change the LiveVü transducer transmit angle to aim the
transducer at a particular area of interest. For example, you
might aim the transducer to follow a bait ball or focus on a tree
as you pass it.
1
From a LiveVü sonar view, select Menu > Transmit Angle.
2
Select an option.
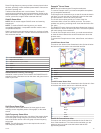
Adjusting the RealVü Viewing Angle and Zoom Level
You can change the viewing angle of the RealVü sonar views.
You can also zoom in and out of the view.
From a RealVü sonar view, select an option:
• To adjust the viewing angle diagonally, select .
• To adjust the viewing angle horizontally, select .
• To adjust the viewing angle vertically, select .
• To adjust the viewing angle, swipe the screen in any
direction.
• To zoom in, spread two fingers apart.
• To zoom out, pinch two fingers together.
Adjusting the Appearance of the RealVü Sonar Views
1
From a RealVü sonar view, select Menu.
2
Select an option:
• To adjust the depth at which the color palette starts over,
select Palette Depth, and select an option.
• To select a different color palette for the sonar return
points, select Sonar Setup > Point Colors, and select an
option.
• To select a different color palette for the bottom, select
Sonar Setup > Bottom Colors, and select an option.
• To select a different style for the bottom, select Sonar
Setup > Bottom Style, and select an option.
• To hide or show the color legend on the side of the
screen, select Sonar Setup > Color Key.
Adjusting the RealVü Sweep Speed
You can update how quickly the transducer sweeps back and
forth. A faster sweep rate creates a less detailed image, but the
screen refreshes faster. A slower sweep rate creates a more
detailed image, but the screen refreshes more slowly.
NOTE: This feature is not available for the RealVü 3D Historical
sonar view.
1
From a RealVü sonar view, select Menu > Sweep Speed.
2
Select an option.
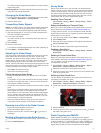
Turning On the A-Scope
NOTE: This feature is not available in all sonar views.
The a-scope is a vertical flasher along the right side of the full-
screen sonar view. This feature expands the most recently
received sonar data so that it is easier to see. It can also be
helpful for detecting fish that are close to the bottom.
From a sonar view, select Menu > Sonar Setup >
Appearance > A-Scope > On.
Selecting the Transducer Type
Before you can select the transducer type, you must know what
kind of transducer you have.
If you are connecting a transducer that was not included with the
chartplotter, you may need to set the transducer type to make
the sonar function properly. If the device automatically detected
your transducer, this option does not appear.
1
From a sonar view, select Menu > Sonar Setup >
Installation > Transducer Type.
2
Select an option:
• If you have a 200/77 kHz, dual-beam transducer, select
Dual Beam (200/77 kHz).
• If you have a 200/50 kHz, dual-frequency transducer,
select Dual Frequency (200/50 kHz).
• If you have another type of transducer, select it from the
list.
Sonar Setup
NOTE: Not all options and settings apply to all models, sounder
modules, and transducers.
Sonar Settings
NOTE: These settings do not apply to Panoptix transducers.
See RealVü Sonar Settings, page 19 and LiveVü Sonar
Settings, page 19.
From a sonar view, select Menu > Sonar Setup.
Scroll Speed: Sets the rate at which the sonar scrolls from right
to left (Setting the Scroll Speed, page 17).
In shallow water, you can select a slower scroll speed to
extend the length of time the information is displayed on
screen. In deeper water, you can select a faster scroll speed.
Automatic scroll speed adjusts the scrolling speed to the
speed the boat is traveling.
Noise Reject: Reduces the interference and the amount of
clutter shown on the sonar screen (Sonar Noise Rejection
Settings, page 19).
18 Sonar