


16
17
power them on, and select the route they plan to use for navigation.
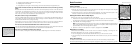
1. Press MENU, highlight the Routes option, and press ENTER.
2. Highlight the route and press ENTER. The map displays.
3. Highlight the Navigate button and press ENTER. The map displays.
4. Press MENU, highlight the Tracks option, and press ENTER.
5. Ensure the On button is activated. If it is not, highlight the On button and press ENTER to
activate it.
6. To view the location in real time, press QUIT to display the Map Page.
The GPS device not only tells them where they are in real time but also keeps a record (track) of
everywhere they’ve been. Once they’ve finished the trail, they decide to save the track so that they
can see where they’ve ridden.
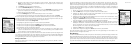
7. Press MENU, highlight the Tracks option, and press ENTER.
8. Highlight the Save button and press ENTER.
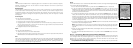
Since they might want to visit this track again later, they decide to name the track with the trail name
and assign it the same color that they assign all of the trails they’ve ridden. They also use the com-
ments feature in the Tracks screen to note if they thought the trail was easy, moderate, or difficult.
9. Highlight the Track text field and press ENTER to name the track “GW Forest” using the key
board. Then, highlight OK and press ENTER.
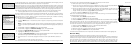
10. Highlight the Color block and press ENTER. Use the arrow keypad to highlight the color blue
and press ENTER.
11. Highlight the Comment text field, press ENTER, and assign a difficulty comment using the
keyboard. Then, highlight OK and press ENTER.
12. Highlight the View button and press ENTER to see a snapshot of where you went on the trail.
When they arrive home, they download the track and waypoint information into their DeLorme soft-
ware so they can see a larger view of where they were. They finish by saving the track information in
their mountain biking library project.
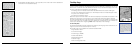
Mapping Assets in the Field
Up-to-datemapsareoftencriticaltoefcientlymanageandmaintaincompanyassets.Youmayneed
severallayersofinformationtolocateandupdateinformationabouttheseassetsintheeld,such
asroad,topographic,andhistoricmaps,aswellashigh-resolutionaerialimageryandGISlayers.The
EarthmateGPSPN-20isideallysuitedtohandletheseneeds;youcantransfervirtuallyanytypeof
datafromDeLormesoftwareontothedeviceforuseintheeld,andthenusetheEarthmateGPS
PN-20 to map new assets and the conditions of existing assets. You can then bring this information
backintotheofcetoupdatethecentraldatabase.
The division managers of a utility company are responsible for overseeing the bi-monthly update of
the spatial database for each division. They must collect information regarding new line locations,
conditions, and areas requiring repair or replacement to update the database and assist in planning
for the next month’s maintenance schedule.
The company uses the Earthmate GPS PN-20 with DeLorme’s professional XMap
®
GIS software
to perform the updates. Each division is divided into quadrants with crews of two assigned to each
quadrant. Each crew has an Earthmate GPS PN-20 and is responsible for uploading the maps and
data they need on the device before heading out into the field. This data includes an updated copy of
the quadrant’s GIS utility line layer, road and topographic maps, waypoints of pole mile markers, high-
resolution aerial imagery downloaded from the state GIS department, and digitally scanned paper
maps of utility line schematics. These maps are geo-registered to the DeLorme map using XMap.
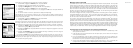
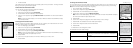
Preparing data for and transferring data onto the Earthmate GPS PN-20
1. Open XMap, set up a subscription to the central database, and obtain an updated copy of the
utility layer for the division.
2. Load the GIS layer into the GIS tab and use the spatial query tool to isolate the line objects
within a particular quadrant.
3. From the ImageReg tab, open the digital image of the schematic map for the quadrant. Use
the GIS line layer as reference to place points on the digital image that correspond to points on
the DeLorme map. Then, process the image to geo-register it to the map.
4. Visit the state GIS website and download any digital aerial imagery in .sid or .tiff format that
corresponds to the quadrant. Use the Map Data tab to load the imagery into XMap.
Scenarios
Editingtrackdetails
Navigating a route