


9
2
CYLINDER BLOCK ASSEMBLY
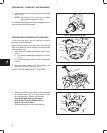
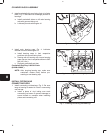
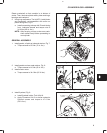
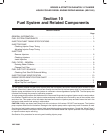
3. Install crankshaft with gear facing front of cylinder
block, Fig. 3. Take care not to damage journals or
bearings.
a. Install crankshaft shims on #3 main bearing
web with grooves facing out.
b. Lubricate journals with engine oil.
Fig. 3 – Installing Crankshaft
INSTALL
SHIMS
#3 MAIN
BEARING
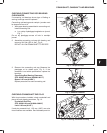
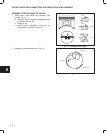
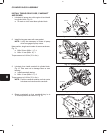
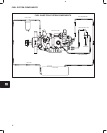
4. Install main bearing caps, Fig. 4. Lubricate
threads of screws with engine oil.
a. Install bearing caps in their respective
positions with arrows facing front.
b. Starting with #3 bearing cap, torque bearing
caps one at a time in sequence shown to 58.0
Nm (43 ft. lbs.).
c. Recheck crankshaft end play.
Crankshaft End Play: 0.025-0.24 mm
(0.0008-0.0094”)
NOTE: After torquing bearing cap, make sure
crankshaft rotates freely before pro-
ceeding to next bearing cap.
Fig. 4 – Installing Main Bearing Caps
ARROW
FRONT
FRONT
#1
#2
#3
#4
3
412
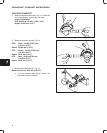
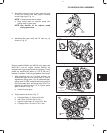
INSTALL PISTONS AND
CONNECTING RODS
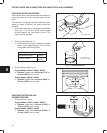
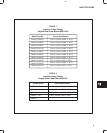
1. Install connecting rod bearings, Fig. 5. Be sure
tang on bearing is seated in notch in connecting
rod and cap.
a. Install a piece of vinyl tubing over each
connecting rod screw to prevent damage to
screw threads or crankpin when installing
piston and connecting rod.
Fig. 5 – Installing Connecting Rod Bearings
NOTCH
VINYL TUBING
ID MARK