


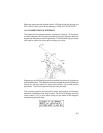


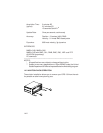
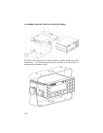

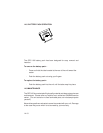
To remove the GPS 100 from the aviation rack...
· Gently push the GPS 100 into the rack with one hand to unload the
springs along the sides of the rack. (Do not apply pressure to the
display lens.) Firmly insert an ejector pin into each side of the unit
using the other hand. (Do not use any sharp tool as a substitute;
damage to the retainer springs or the unit may result.)
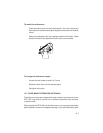
· Gently slide the unit from the rack.
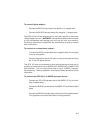
To insert the GPS 100 into the aviation rack...
· Gently push the GPS 100 into the rack until the unit locks securely
into place.
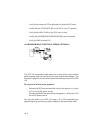
14.3 AVIATION INTERFACE SETUP
The aviation rack contains an electronic module which provides interfaces to
other aviation instruments. Before installing the GPS 100 into the aviation
rack, several operating parameters need to be set. (See Chapter 11 for more
information.) The following configuration is required when using the aviation
rack:
STEER TO > D-BAR (see Section 11.3)
OUTPUT > AVIATION (see Section 11.7)
Additionally, proper setup of the following parameters are required. Typical
settings are:
CDI SCALE > ±5.00 (see Section 11.3)
NAV > nm kt (see Section 11.6)
ALT > ft FPM (see Section 11.6)
DATUM > WGS 84 or as indicated on your navigation charts.
(see Section 11.7.)
14.4 PRE-FLIGHT CHECKOUT PROCEDURE
The following checkout procedures should be performed prior to using the
GPS 100:
· With power applied to the aviation rack, turn the GPS 100 on. The
Self-Test Page will be displayed.
14-3