14
Getting Started
Compass/Highway
Navigation Pages
Now that we’re navigating to an actual destination, let’s move on to the GPS 152 navigation pages
by pressing the PAGE key.
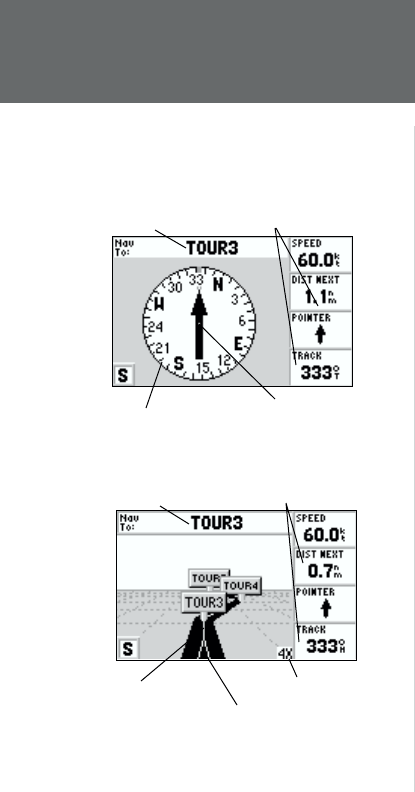
The GPS 152 features two different navigation pages: Compass and Highway. The Compass Page is
fi rst. This page provides graphic steering guidance to a destination waypoint, with an emphasis on the
bearing to your destination and current direction of travel. (The Highway Page places greater emphasis
on the straight-line desired course and the distance and direction you are off course.) The middle of the
page features a rotating ‘compass ring’ that shows your course over ground (track) while you’re moving,
and a bearing pointer that indicates the direction of the destination (bearing) relative to the course over
ground. The compass ring and pointer arrow work independently to show—at a glance—the direction
of your movement and the direction to your destination. For instance, if the arrow points up, you are
going directly to the waypoint. If the arrow points any direction other than up, turn toward the arrow
until it points up—then continue in that direction.
The current speed and distance to the next waypoint as well as the pointer to the next waypoint are
displayed on the right side of the screen. This page provides better steering guidance than the Highway
Page when travelling at slower speeds and/or when making frequent directional changes. When you
are not navigating to a waypoint, the compass will show your direction of travel as you move but
the arrow will not appear.
Let’s move on to the Highway page by pressing the PAGE key.
The GPS 152’s Highway Page also provides graphic steering guidance to a destination waypoint. As
you head toward your destination, the middle of the screen provides visual guidance to your waypoint
on a moving graphic “highway.” Your present position is at the bottom center of the highway display.
The line down the middle of the highway represents your desired course. As you navigate toward a
waypoint, the highway will actually move—indicating the direction you’re off course. To stay on course,
simply steer toward the center of the highway or “keep it on the road”. The four default data fi elds on
the right side of the page indicate speed and distance to the next destination (or the next waypoint in
Compass Ring
Pointer Arrow
Current
Destination
Data Fields
Zoom Scale
Data Fields
Desired Course
Current
Waypoint
Present Position


