


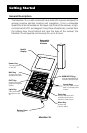


11
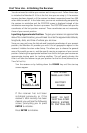
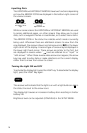
Press NAV or PLOT (which will take you
to a NAV or PLOT screen if you are not
already there), then press ENTER,
highlight SAVE POS and press ENTER.
This tells the receiver that you want to
store the current position as a waypoint.
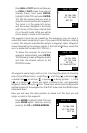
The cursor is in the upper left corner,
and the arrows displayed in the lower
right corner of the screen indicate that
it is in the edit mode. What you will do
next is assign a name to this position.
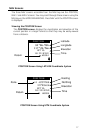
The waypoint name can be created by the receiver or you can input a
name that means something to you. If you press ENTER without creating
a name, the receiver automatically assigns a waypoint name. Waypoint
names assigned by the receiver appear in the format WPxxx, where the
xxx is a sequential number (001, 002 etc.).
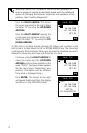
To allow the receiver to name the
waypoint automatically, press ENTER.
The following screen will appear briefly
and then the receiver returns to the
POSITION screen.
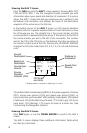
All waypoint names begin with an icon. You have the option of choosing
one of nine different icons: a right flag ( ), a left flag ( ), a diamond ( ),
a double box( ), an anchor ( ), a square ( ), a diving symbol ( ), a fish
( ), or a target ( ). Unless you select a different icon, unit-generated
waypoint names use a pin ( ) icon. These icons will be used to display the
relative location of the waypoint on the PLOT screen and the ROAD screen
(described later).
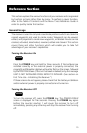
Now you will save the same position as above, but this time you will
assign a name to the waypoint.
Press ENTER, highlight SAVE POS and
press ENTER again. Select an icon by
pressing the UP or DOWN ARROW .
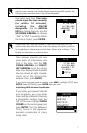
34`06.58N
117`49.56W
0FT EL
SAVE POS
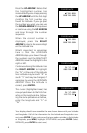
34`06.58N
117`49.56W
0 F T E L
SAVE POS
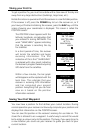
34`06.58N
A
18OCT96
117`49.56W
0 F T E L
11:56
SAVE POS
WP001