


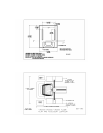
28. Measure to position entry steps and front support stand per drawing. Install the
base restraint brackets, one each side per drawing. See DET-005
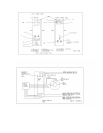
29. Locate all cabling from control console to the ride and install. See DET-002
30. Locate and install all cabling from kiosk to power and control console interface.
See DET-002
31. Connect all cables from the pitch signal slip ring to the interface board, control
console, and cockpit power strip (115 VAC). DET-002,020,019,021
32. Position and connect all sensor cables to the interface board. Match up plug and
receptacle numbers. DET-020
33. Position and connect analog feedback cable from power box to the interface
board. DET-020
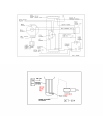
34. Locate and position Main AC power cord. Connect to the power box but do not
plug into outlet on wall at this time. (208 VAC, 3 phase). DET-006,001
35. Position any extension cords from control console and kiosk to the wall outlets.
Connect to power source and verify power is available. DET-006
36. Power up control console. Turn power strip “ON”, turn UPS “ON” green light
on, turn computer “ON”, turn monitor “ON”. Allow computer to initialize.
Check to see that there are no faults on the computer.
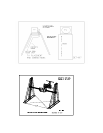
37. Locate and install TV on top of left cabinetry. Secure with screws provided.
Connect AC power cord and video feed cable to the TV. DET-007
38. On computer initiate a defrag of C drive. Once completed initialize the program.
39. Turn Pre-amp and Main amp to “ON”. Set volume to min and then slowly raise
to normal. Audio must be heard from cockpit speakers and outside speakers if
installed. If sound is good turn volume down.
40. Shut program down but leave computer “ON”.
41. Plug main power into wall receptacle . This makes power available to the power
box.
42. Lower, latch and lock the canopy.
NOTE: During the next step should there be any
movement immediately push E-Stop to OFF. Slight
motion in roll may happen when brake to is released
by program.