


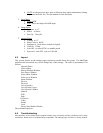


xx. Position the long 3/8 inch bolt on end top mount plate hole, attach
two 3/8 nuts over bolt, swing motor up and feed bolt through upper
mount hole on A frame. Attach 3/8 lock washer and nut. Do not
tighten now.
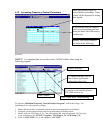
xxi. Measure distance from side of shaft to main base at both ends of the
drive shaft, the distance must be equal. See DET-
xxii. Adjust and then tighten the top motor mount bolt when distances are
correct.
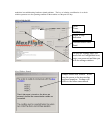
xxiii. Remove ¼ allen wrench from coupling sleeve and reinsert the grease
plug. This procedure assures that the proper distance is set between
main and motor shafts so that they do not bottom out during
operations.
xxiv. When all is aligned, go over the entire network and loctite each
screw/bolt in turn.
xxv. Position the lift encoder @ 3.5-4.0 inches from the flex motor
coupling and tighten the locking collar.
xxvi. Ensure that the brake release knob at the end of the lift motor is OFF
CCW and moves freely.
CHAPTER 4 –COMPUTER SYSTEM / INTERFACE
4-1 Introduction
This section is designed to provide you with the necessary settings pages to troubleshoot any of
our simulators. The setup follows the presentation order of the system manager program. Only
the pages that can be altered are listed in this appendix. It has been noted at several locations that
local computer “experts” have changed settings in order to enhance their riding pleasure only to
have unbalanced the system causing failures. The readings displayed within these pages should
represent a guideline for your settings only. Always refer to your machines particular original
setting records to return your system to an operating condition. Never change a setting without
authorization from the MaxFlight Technical Support Division.
4-2 Hitachi Projector Settings
4-2A Hitachi Projector Settings for Models 220 and 270
To obtain the best possible picture from these new style projectors the following settings are the
ones we at the factory set into the projector electronics. Again verify which projector you
received and is installed on your unit. For best results read the Factory Manual provided on the
projector. The Manual is also available on the CD-Rom that has all the unit manuals.
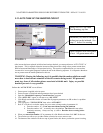
1. Turn computer ON, have video signal present at the projector.
2. Turn cockpit power ON
3. Turn projector lamp power ON, using remote.
4. When lamp is bright and signal present using the remote select and set the following
parameters;
a. Select Menu
----all items are default settings except ASPECT, this must be set to
the second icon in or 16:9