


20 CLCH-IM-16A
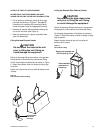
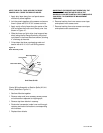
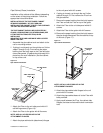
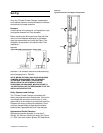
NOTE: THE SEAM CAP SHOULD BE CUT TO SIZE TO
COVER THE SEAM AND TAPE.
2 Install the seam cap directly over the seam and
tape. Attach using #10-16 x 3/4” screws through
all predrilled holes in the cap.
3 Caulk the gap between the top of the seam cap
and the bottom of the raceway.
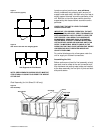
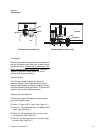
Figure 14
Panel Assembly
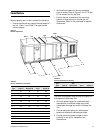
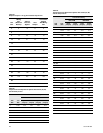
Hood (Back and Side) Installation
Inlet hoods should be installed after the unit has
been set in place. They should not be stacked on the
unit as it is being hoisted. Mounting hardware and
caulking tape for the inlet hoods are located inside
the unit. For installation complete the following:
NOTE: THE HOOD ASSEMBLY SHOULD BE
SUPPORTED BY CHAINS, SPREADER BAR, OR
OTHER MEANS (SEE LIFTING INSTRUCTIONS
SECTION) WHEN INSTALLED TO THE UNIT.
MOUNTING TAPE AND HARDWARE ARE LOCATED
INSIDE THE UNIT.
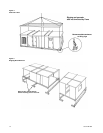
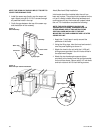
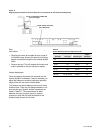
1 Apply the 1” butyl tape in a strip around the
perimeter of the hood.
2 Using the lifting lugs, hoist the hood and center it
over the panel opening as shown in.
3 Attach the hood to the unit with the 1/4-20 self-
drilling screws provided. Use ALL holes drilled in
the attachment flanges.
4 Attach the two hood angle supports (when
provided) to the hood at one end and the bracket
on the unit as shown. Secure with 5/16” lock bolts
and lock nuts and #10-3/4 self-drilling screws.
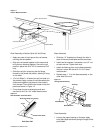
Figure 15
Hood and Pipe Cabinet Installation
Butyl Tape
Raceway
Outer Panel
Base
Seam Cap
#10 Screw
Butyl Tape
Hood
Angle Support
#10 Screw