


3-30 DISASSEMBLY, REASSEMBLY, INSPECTION, AND MAINTENANCE
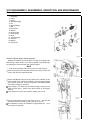
Valve System
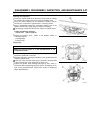
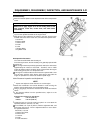
HLA Removal
CAUTION
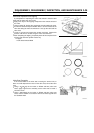
Always keep the HLA upright, with the end of the HLA on which
the snap ring is visible facing up (socket "A" faces up). If it is
placed on its side or upside down, the oil that is sealed in the
high-pressure chamber [B] could leak out, disabling the HLA
function.
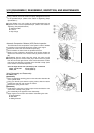
CAUTION
Do not disassemble the HLA because it is extremely difficult
to replenish the oil that is sealed in it.
•
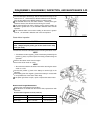
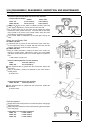
Make sure that the piston is in the top-dead-center of the compression
stroke.
•
Pull the HLA [A] out towards the cylinder head.
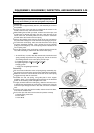
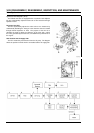
HLA Inspection
If the valve train noise does not go away after the engine is started,
it could be due to the following reasons:
•
Wear at the clearance between the HLA body [D] and the plunger
[G].
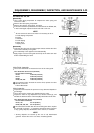
•
Debris wedged in the HLA body between the check ball [E] and the
check valve seat [O].
•
A drop in the hydraulic pressure of the oil supply path for some reason
(refer to the section on the Lubrication System).
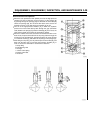
NOTE
If debris becomes wedged in the HLA body between the check
ball [E] and the check valve seat [O], it is structurally unfeasible
to perform a repair. Therefore, it is very important to prevent
contamination when changing the engine oil or repairing the engine.
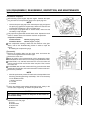
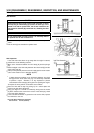
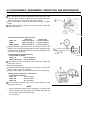
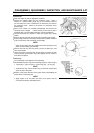
To inspect the HLA, perform a leak-down test as follows:
•
Place the HLA with its snap ring facing up on a surface plate and
measure the leak-down dimension.
•
Using your finger or a rod with a rounded tip, firmly press the socket
[A] down. Measure the extent of the recess of the socket [A], which
is the leak-down dimension.
•
If the leak-down dimension is greater than the service limit, replace
the HLA with a new one.
HLA Leak-Down Dimension (maximum)
Service Limit: 0.5 mm (0.002 in)