


3-12 DISASSEMBLY, REASSEMBLY, INSPECTION, AND MAINTENANCE
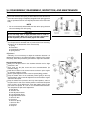
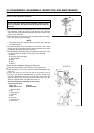
Fuel Tank and Filter
•
Place an appropriate container under the fuel filter to catch the fuel.
Remove the filter pot, turn the fuel tap ON, and completely drain the
fuel from the fuel tank and the fuel line.
If the drained fuel contains dust or water, the fuel line from the fuel
filter to the carburetor must be inspected and cleaned.
CAUTION
Gasoline is extremely dangerous due to its high volatility. Han-
dle it away from sparks or fire and ensure proper ventilation.
•
If the fuel tank is deformed, cracked, or rusted, replace it with a new
one.
•
After draining the fuel from the tank, pour a cleaning solvent into the
tank and shake it well. Discard dust and sediments together with the
cleaning solvent.
•
Using compressed air, thoroughly dry the inside of the fuel tank and
the fuel filter before installing them.
•
Make sure that the fuel gauge operates smoothly, and replace it with
a new one if it is defective.
•
Inspect the breather hole in the tank cap and the air passage to make
sure that they are not plugged.
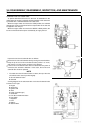
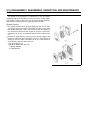
•
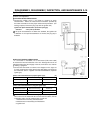
Remove retaining screw [8] on the inside of the tank cap and remove
spring plate [7].
NOTE
Retaining screw [8] is a tapping screw, so make sure not to crush
the threads. It is best not to overtighten the screw.
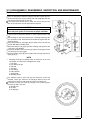
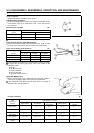
1. Fuel Tank
2. Fuel Filter (fuel tap)
3. Filter Pot
4. Tank Cap
5. Fuel Gauge
6. Filter (strainer)
7. Spring Plate
8. Retaining Screw
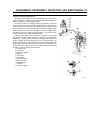
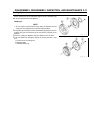
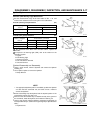
•
Use adhesive tape to cover hole [A] from which the screw was
removed. Place your mouth on air hole [B] to blow air into it and
verify that air comes out with great force from air passage [C].
If air does not come out of the air passage or if it is weak, replace
the tank cap with a new one.
A: Thread Hole
B: Air Hole
C: Air Passage