


104
The daylight display is used even when the vehicle lights are on.
Possible causes:
(1) “Day Display” is selected on “Map Display.”
(2) The Orange/white lead is not connected.
Solutions:
(1) Check the “Map Display” setting (see “Map Display” on page 88) and make sure “Illumination”
is selected.
(2) Check connection.
The system will not switch on or will not operate.
Possible causes:
Installation or connection has been carried out incorrectly.
Solutions:
Check with your dealer.
The display is very dim.
Possible causes:
(1) The vehicle’s light is turned ON, and “Illumination” is selected on “Map Display”.
(2) The vehicle cabin temperature is extremely low.
Solutions:
(1) Read about the “Map Display” setting (see “Map Display” on page 88) and, if desired, select
“Day Display”.
(2) A Liquid Crystal Display (LCD) is used, and such displays tend to darken when cold. Wait for the
vehicle to warm up.
There is no voice guidance or the volume is low.
Possible causes:
The volume setting is low.
Solutions:
Check the volume setting on the display or turn the volume up according to “Hardware Volume” (see
“Hardware Volume” on page 88) and/or turn up the volume on the display.
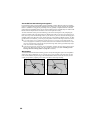
The Remote Controller fails to work.
Possible causes:
(1) The batteries are low.
(2) The batteries have been inserted incorrectly.
(3) The Remote Controller is pointing at the floor or a seat.
(4) The signal receptor on the display is exposed to direct sunlight.
(5) The Mode switch of the Remote Controller is not set correctly.
Solutions:
(1) Change the batteries.
(2) Check that the batteries are properly inserted according to the + and - markings.
(3) Ensure that the Remote Controller has a clear line of sight to the display unit.
(4) Move the Remote Controller closer to the receiver on the display unit.
(5) Set the Mode switch of the Remote Controller correctly (see “Selecting dipswitches” on page
15).
The image sways
Possible causes:
The setting of “Monitor Type” on the Settings menu is not appropriate.
Solutions:
Change the setting of “Monitor Type” (see “Monitor Type” on page 88) to the different setting.