


2-3
4. Press the ENTER key to conclude your
selection followed by the RADAR
MENU key to close the FUNCTIONS
menu. The ship's speed readout at the
top of the screen shows own ship's
speed fed from the speed log preceded
by the label "LOG."
5. When the speed log is used, select
speed reference to either of SEA or
GND(ground) on the ARPA 2 menu.
Notes:
1) IMO Resolution A.823:1995 for ARPA
recommends that a speed log to be in-
terfaced with an ARPA should be ca-
pable of providing through-the-water
speed data rather than over-the-ground
speed.
2) Be sure not to select LOG when a
speed log is not connected. If the log
signal is not provided, the ship speed
readout at the top of the screen will be
blank. In the event of a log error, you
can continue plotting by entering a
manual speed.
3) If a log signal interval becomes more
then 30 seconds with the ship's speed
5KT or more, the radar regards the
speed log is in a trouble and LOG FAIL
appears, reading xx-x KT. For R-type,
if no speed input is present for 3 min-
utes at below 0.1KT, the radar regards
the log is in failure.
Manual speed input
To manually enter the ship's speed with
the numeric keys:
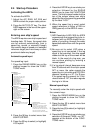
1. Press the RADAR MENU key on the
plotting keypad to show the FUNC-
TIONS menu.
2. Press the key [6] to select menu item
6SHIP'S SPEED.
3. Press the key [6] to select (or highlight)
MAN option.
4. Press the ENTER key to conclude your
selection. At this point, "MAN = xx.x KT"
appears at the bottom of the FUNC-
TIONS menu.
2.4 Start-up Procedure
Activating the ARPA
To activate the ARPA:
1. Adjust the A/C RAIN, A/C SEA and
GAIN controls for proper radar picture.
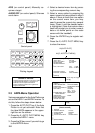
2. Press the AUTO PLOT key. The label
ARPA appears in the box at the upper-
right on the screen.
Entering own ship's speed
The ARPA requires own ship's speed and
heading data. Of these, the speed data
can be entered automatically from a
speed log, navaid, or manually through
the numeric keys or based on a selected
reference target (such as a buoy or other
prominent stationary target).
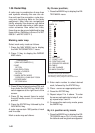
Automatic speed input
For speed log input:
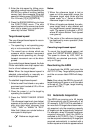
1. Press the RADAR MENU key on the
plotting keypad to show the FUNC-
TIONS menu.
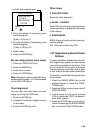
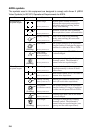
FUNCTION KEY 1
1. SYSTEM SETTNG 1
2. FUNCTION
(FUNC1, RIVER, BUOY, SHIP, SHORT,
LONG, CRUISING, HARBOR, COAST,
OCEAN, ROUGH SEA)
3. INT REJECT (OFF, 1, 2, 3)
4. ECHO STRETCH (OFF, 1, 2)
5. ECHO AVERAGE (OFF, 1, 2, 3)
6. A/C AUTO (OFF, ON)
7. FUNC 1 PULSE WD
8. NOISE REJ (OFF, ON)
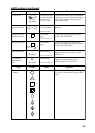
FUNCTION KEY 2, 3
1. SYSTEM SETTING 1
2. FUNC KEY 2 or 3 (PICTURE/OPERATION)
3. FUNCTION
(FUNC2(3), RIVER, BUOY, SHIP, SHORT,
LONG, CRUISING, HARBOR, COAST,
OCEAN, ROUGH SEA)
4. INT REJECT (OFF, 1, 2, 3)
5. ECHO STRETCH (OFF, 1, 2)
6. ECHO AVERAGE (OFF, 1, 2, 3)
7. A/C AUTO (OFF, ON)
8. FUNC 2(3) PULSE WD
9. NOISE REJ (OFF, ON)
FUNCTION KEY 4
1. SYSTEM SETTING 1
2. FUNC KEY 4 (OPERATION, WATCH ALARM)
3. ALARM INTERVAL (6, 10, 12, 15, 20 MIN)
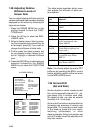
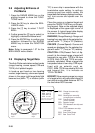
1. FUNCTION KEY 1, 2 or 3
2. 0.5 NM (S1, S2)
3. 0.75 NM (S1, S2)
4. 1.5 NM (S1, S2, M1)
5. 3 NM (S1, S2, M1)
6. 6 NM (M1, M2, L)
7. 12-24 NM (M2, L)
1. SYSTEM SETTING 1
2. FUNC KEY 2 (3) (PICTURE/OPERATION)
3. OPERATION
(HU, HU TB, CU, NU, TM, TRAIL; CU, TM RESET;
OFF CENTER, IDX LINES, CURSOR OFFSET,
ECHO STRETCH1, ECHO STRETCH2, PLS WD1,
PLS WD2, ECHO AVG1, ECHO AVG2, ECHO AVG3,
ECHO COLOR, TRAIL BRILL, PANEL BRILL,
CHAR BRILL, NOISE REJ, TARGET DATA, CANCEL)
2. Press the [6] key to select menu item
6SHIP'S SPEED.
3. Press the [6] key to select (or highlight)
LOG option.