


5-6
RayChart 420/420D Chartplotter
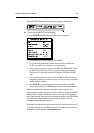
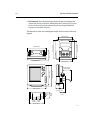
The unit can be panel mounted, using the panel-mounting kit (accessory)
available from your local Raytheon dealer.
Panel mount the unit as follows:
1. Check the selected location for the unit. A clear, flat area at least 175mm
(7in) wide by 190mm (7½in) high, with at least 90mm (3½in) of clearance
behind the panel, is required.
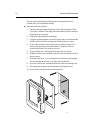
2. Unpack the (optional) panel-mounting kit.
3. Using the supplied template, trace out the display unit cut-out and mark the
drilling centres for the four securing holes outside of the cut-out area.
4. To provide start holes for removing the cut-out, drill four 10mm (
3
/
8
in)
holes in each opposing corner and four 6mm (
1
/
4
in) holes for the two
trunnion lug clearance slots in the cut-out area.
5. Using a suitable saw, cut along the inside edge of the cut-out line.
6. With the trunnion (yoke) and knobs removed, make sure that the unit fits in
the cut-out area.
7. Drill out the four 5mm (
3
/
16
in) securing holes as indicated on the template.
It is recommended that a 1mm (
1
/
16
in) pilot hole is drilled first.
8. Screw the studs into the vacant holes at the rear of the unit, hand tight only.
9. Place the gasket on the unit and slide the unit into the panel cut-out.
10. Secure the unit with the thumb nuts, hand tight only.
D4722_1