


1 INSTALLING THE HFG2.0
1.1 Before Beginning
Inspection
The HFG2.0 should be inspected immediately after unpacking. Check for
dings or dents or any other obvious signs of damage. Remove the
protective caps from the connectors and check for any bent pins or
damage to the threads of the connectors. Examine the wires of the signal
and power harnesses for any signs of damage to the wire insulation.
In the event that any damage is detected, contact PECC for instructions
about how to proceed.
Note: Retain the actuator’s original shipping container. In the
event of future transportation requirements, this container
will minimize any damage during shipment.
Recommended Installation Process
Users must determine if it is best to couple the HFG2.0 to the load before
or after the installation has been tested.
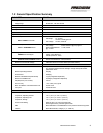
• Review the general specifications
• Mechanically connect the clevis of the HFG2.0
• Mechanically mount the valve body of the HFG2.0
• Mechanically connect the input pipe of the HFG2.0
• Mechanically connect the output pipe of the HFG2.0
• Connect Case Ground of the HFG2.0 to System Ground
• Connect the 4-wire Power Harness of the HFG2.0 to the user’s
power supply or battery
• Connect the 17-wire Signal Harness of the HFG2.0 to the user’s
controller
• Test the installation
INSTALLING THE HFG2.0 1